Introduction
SayHi
A compelate social media appliction
- Version: v1.6
- Author: IosAppsWorld
- Created: 1 Oct. 2023
- Updated: 08 Apr. 2025
If you have any questions that are beyond the scope of this help file, Please feel free to email via Support.
Basic
SayHi is a complete social platform with fully loaded modules developed using
Yii2, Node.js and and
Flutter Framework.
It comprises of Mobile Applications, Backend Penal. As This is complete
social system with lots of modules
for web and mobile apps, it is compulsory to have some
basic knowledge in both server side and mobile app development if you want
to do the installation, setup
and publishing with your branding yourself.
- Flutter SDK and JDK with path setup in your IDE.
- Real server related knowledge like apache or local machine server,nodejs we preferred to use a real server.
- Basic knowledge in PHP, Yii2, Nodejs and Flutter if you want to do some customization yourself (Not compulsory).
- basic knowledge about google cloud and firebase.
Technologies used
- Flutter- iOS android app
- PHP Yii2 Framework for backend admin panel and rest apis
- mariaDb Database
- Nodejs for chat (socket.io)
- Firebase - For Push notifications
- Storage Option : AWS S3, Azure Storage, Wasabi Storage and Local storage
- SMS : Twilio, msg91, Vonage, Firebase
- Agora for audio/video call and live
- Content moderation: Amazon Rekognition, SightEngine
Server
- Requires PHP v8.4 and MariaDb.
- Mod_rewrite Apache
- Ctype PHP, JSON, PDO, XML, Zip, Gd Extension
- Nodejs v22.14.0
- SSL Required
- Preferred VPS Server: DigitalOcean , AWS, Hostinger
Mobile app
- Android studio or VC code
- Flutter SDK setup (version 3.29.0 Stable)
- JDK with path setup (only for vs code)
- Xcode 16.2+ for IPA file build
- Android studio for APK file build
Install on server
After download the code from codecayon, upload the backend code zip file (sayhi_v1.6_code.zip) in your server root and extract the zip file. Backend admin panel can be installed on a domain or subdomain: For Example, yourdomain.com OR xyz.yourdomain.com.
Database setup
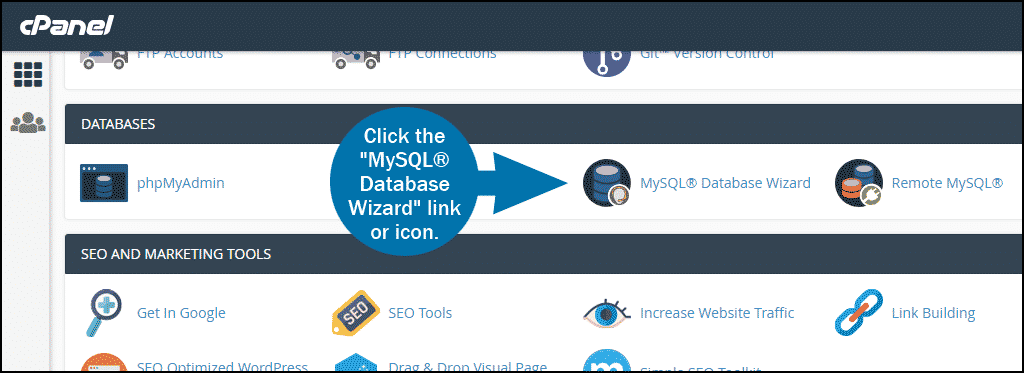
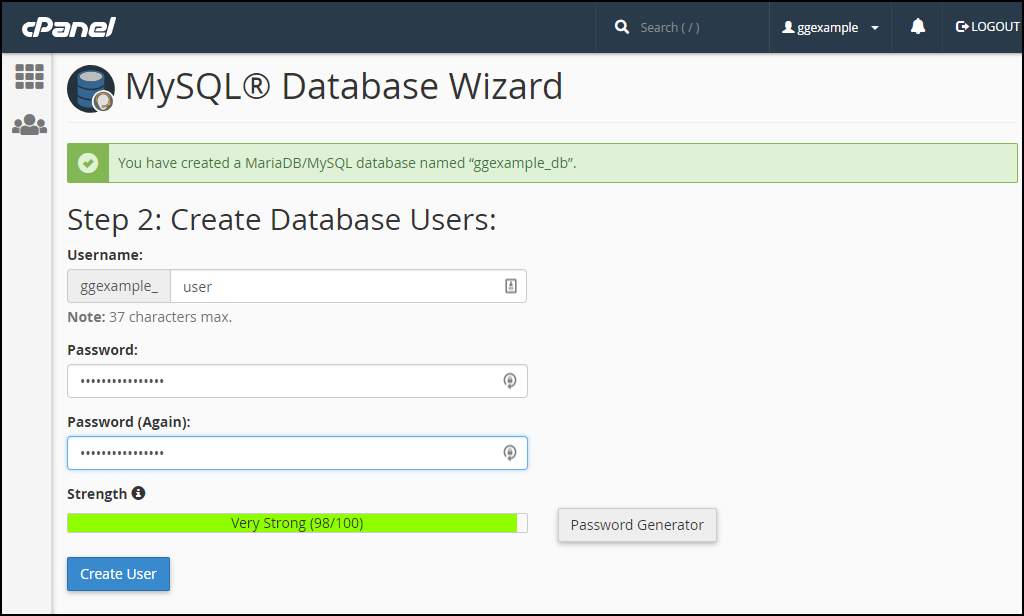
Step 1Create a new database from your server MYSQL database “MySQL® Database Wizard”

Create a DB user to the database and link that database to the DB user and give permission

Import Mysql database file into your database. database file can be find in
doc/db folder in given code.
For new setup use sayhi_v1_6.sql file

Db configuration can be updated in common/config/params.php.
Update dbname, username and password.
<?php

                return [
                    'adminEmail' => 'admin@yourdomain.co',
                    'supportEmail' => 'support@yourdomain.co',
                    'senderEmail' => 'admin@yourdomain.co',
                    'senderName' => 'SayHi',
                    'siteMode' => 1, // 1 for live, 2 for testing , 3 demo
                    'siteUrl' => 'https://example.com',// domain here
                    'siteName'=>'SayHi',
                    'enventoPurchaseCode' => '##########', // envato purchase code
                    'releaseVersion' => '1.6',
                    'testOtp' => '111111',
                    'apiKey.firebaseCloudMessaging'=> '#################', //
                    'user.passwordResetTokenExpire' => 3600,
                    'bsVersion' => '3.1',
                    'bsDependencyEnabled' => false,
                    'db' => [
                        'host' => 'localhost',
                        'name' => '##########',
                        'username' => '###########',
                        'password' => '########',
                        'charset' => 'utf8',
                    ],
                    'smtp' => [
                        'host' => '############', // e.g. smtp.mandrillapp.com or smtp.gmail.com
                        'username' => '############',
                        'password' => '##########',
                        'port' => '587', // Port 25 is a very common port too
                    ],
                ];
Site Url and Envato purchase code
Site url can be update fromcommon/config/params.php
<?php


            return [
                'adminEmail' => 'admin@yourdomain.co',
                'supportEmail' => 'support@yourdomain.co',
                'senderEmail' => 'admin@yourdomain.co',
                'senderName' => 'SayHi',
                'siteMode' => 1, // 1 for live, 2 for testing , 3 demo
                'siteUrl' => 'https://example.com',// domain here
                'siteName'=>'SayHi',
                'enventoPurchaseCode' => '##########', // envato purchase code
                'releaseVersion' => '1.6',  // current installed product version
                'testOtp' => '111111',  // for testing purpose only
                'apiKey.firebaseCloudMessaging'=> '#################', // // Leave it blank, for new v1 api it need setting  See here
                'user.passwordResetTokenExpire' => 3600,
                'bsVersion' => '3.1',
                'bsDependencyEnabled' => false,
                'db' => [
                    'host' => 'localhost',
                    'name' => '##########',
                    'username' => '###########',
                    'password' => '########',
                    'charset' => 'utf8',
                ],
                'smtp' => [
                    'host' => '############', // e.g. smtp.mandrillapp.com or smtp.gmail.com
                    'username' => '############',
                    'password' => '##########',
                    'port' => '587', // Port 25 is a very common port too
                ],
            ];

    ?>
All done for appache srever, your software is ready to run.
Admin Url : youdomin.com/backend/web/index.php
Login information :
Username : admin
Password : 123456
Mandatory setup
Mail Configuration (SMTP)
Mail Configurations part admin can set his Mailer host, user name and his own encryption method and password for this SMTP Mail setup. This configuratin is used for sending mails.
MAil configuration can be updated in
common/config/params.php.
<?php


        return [
            'adminEmail' => 'admin@yourdomain.co',
            'supportEmail' => 'support@yourdomain.co',
            'senderEmail' => 'admin@yourdomain.co',
            'senderName' => 'SayHi',
            'siteMode' => 1, // 1 for live, 2 for testing , 3 demo
            'siteUrl' => 'https://example.com',// domain here
            'siteName'=>'SayHi',
            'enventoPurchaseCode' => '##########', // envato purchase code
            'releaseVersion' => '1.6',
            'testOtp' => '111111',
            'apiKey.firebaseCloudMessaging'=> '#################', //
            'user.passwordResetTokenExpire' => 3600,
            'bsVersion' => '3.1',
            'bsDependencyEnabled' => false,
            'db' => [
                'host' => 'localhost',
                'name' => '##########',
                'username' => '###########',
                'password' => '########',
                'charset' => 'utf8',
            ],
            'smtp' => [
                'host' => '############', // e.g. smtp.mandrillapp.com or smtp.gmail.com
                'username' => '############',
                'password' => '############',
                'port' => '587', // Port 25 is a very common port too
            ],
        ];
Storage Setting
We are giving following three option to store media files. You can choose one storage system according to your requirements
Update storage setting from admin panel setting: Admin > Setting > Storage Setting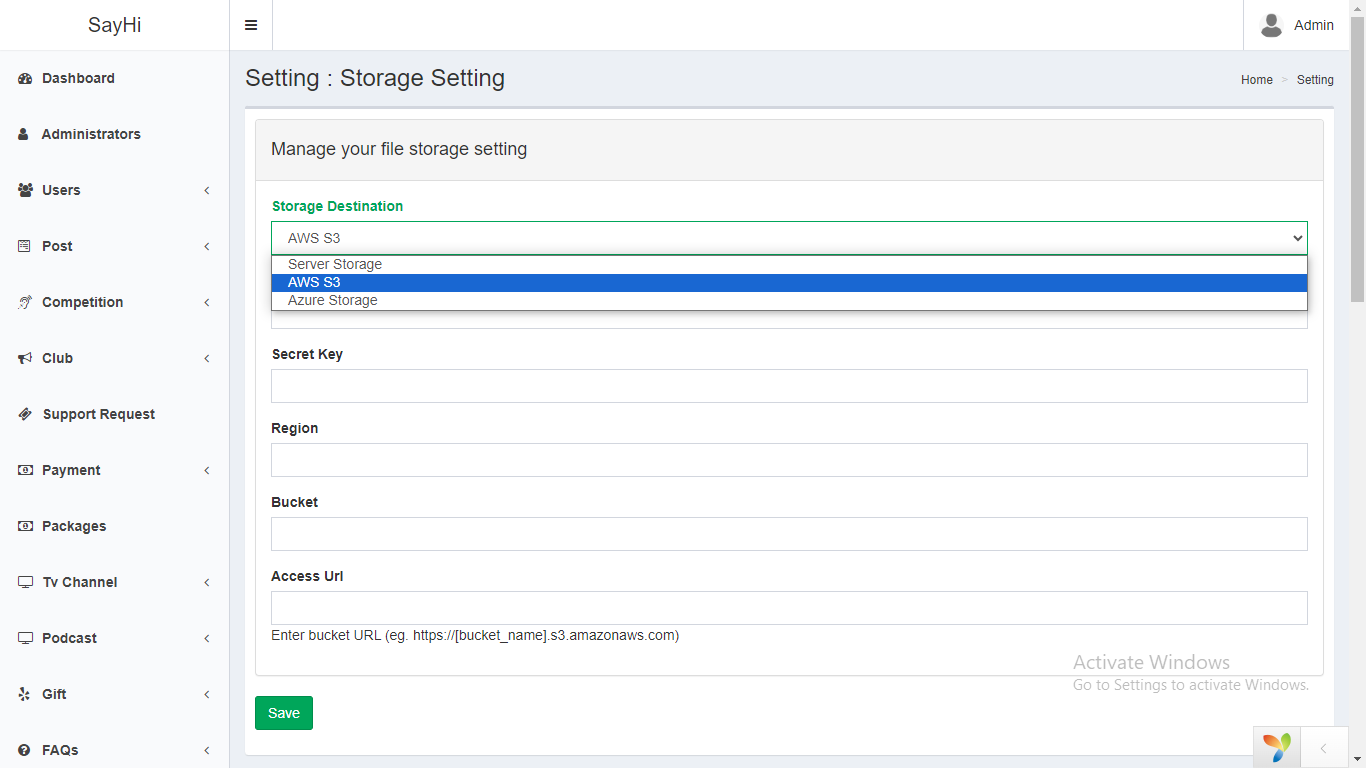
Amazone S3 Setup
We are using amazone s3 for storage files and images.
Step 1Create Bucket
You can create bucket on s3 with public access to follow this URL:
https://docs.aws.amazon.com/quickstarts/latest/s3backup/step-1-create-bucket.html
.
Get AWS S3 Access key and secret access key
Use following url to create secret keys and add in storage setting:https://docs.aws.amazon.com/powershell/latest/userguide/pstools-appendix-sign-up.html#get-access-keys.
Azure Storage Setup
We are using microsoft azure for storage files and images.
Step 1Create access keys (Account Name, Account Key, Container)
You can create azure setup from :
https://learn.microsoft.com/en-us/azure/storage/common/storage-account-keys-manage?tabs=azure-portal
.
After getting these keys you can add in storage setting
Wasabi storage Setup
Following is required for wasabi setup
Step 1Create Bucket
You can create bucket with public access to follow this URL:
https://docs.wasabi.com/v1/docs/working-with-buckets-and-objects
.
Get Access key and secret key
Use following url to create secret keys and add in storage setting:https://docs.wasabi.com/v1/docs/creating-a-user-account-and-access-key.
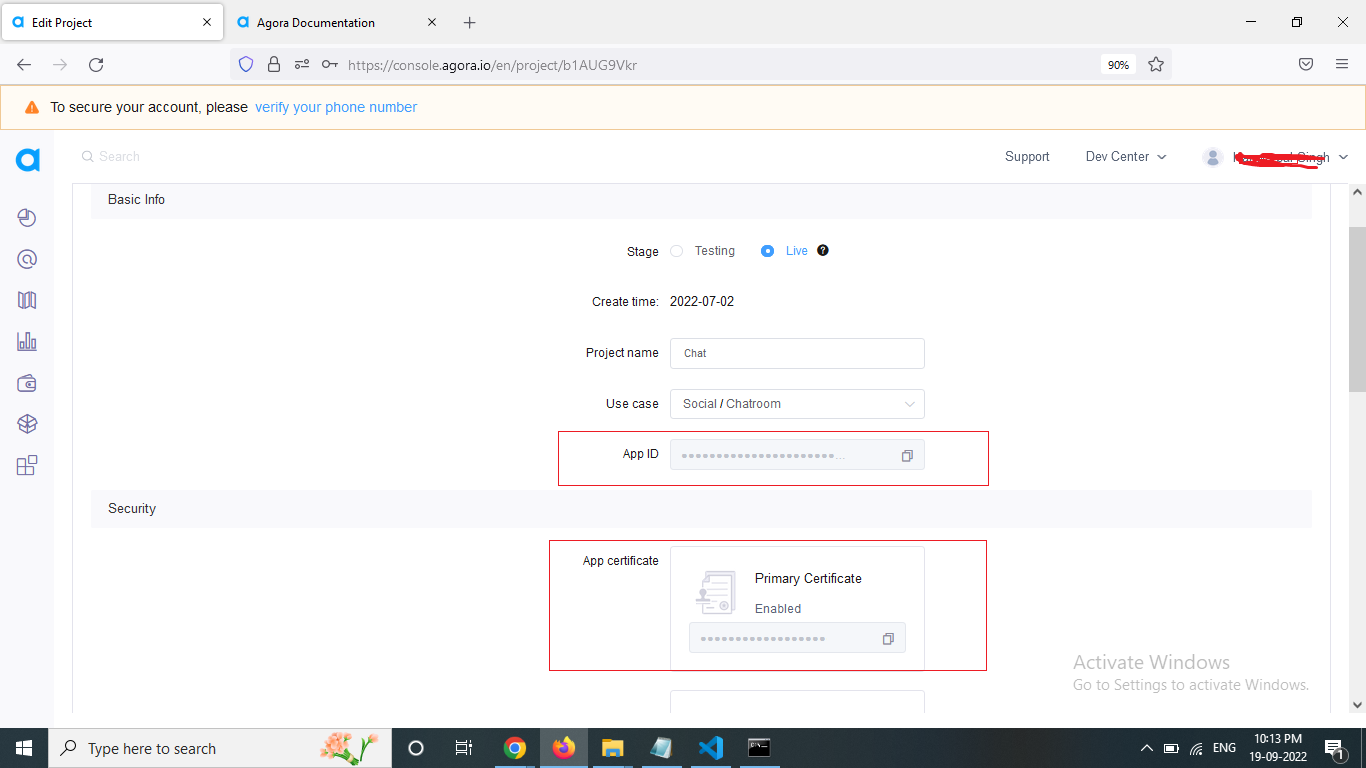
Agora key Setting
Setup Agora api key for audio video calling. You can get your keys.
See here
After Getting the App ID, and App Certificate keys, update it from admin
panel setting:
Admin > Setting > App Setting
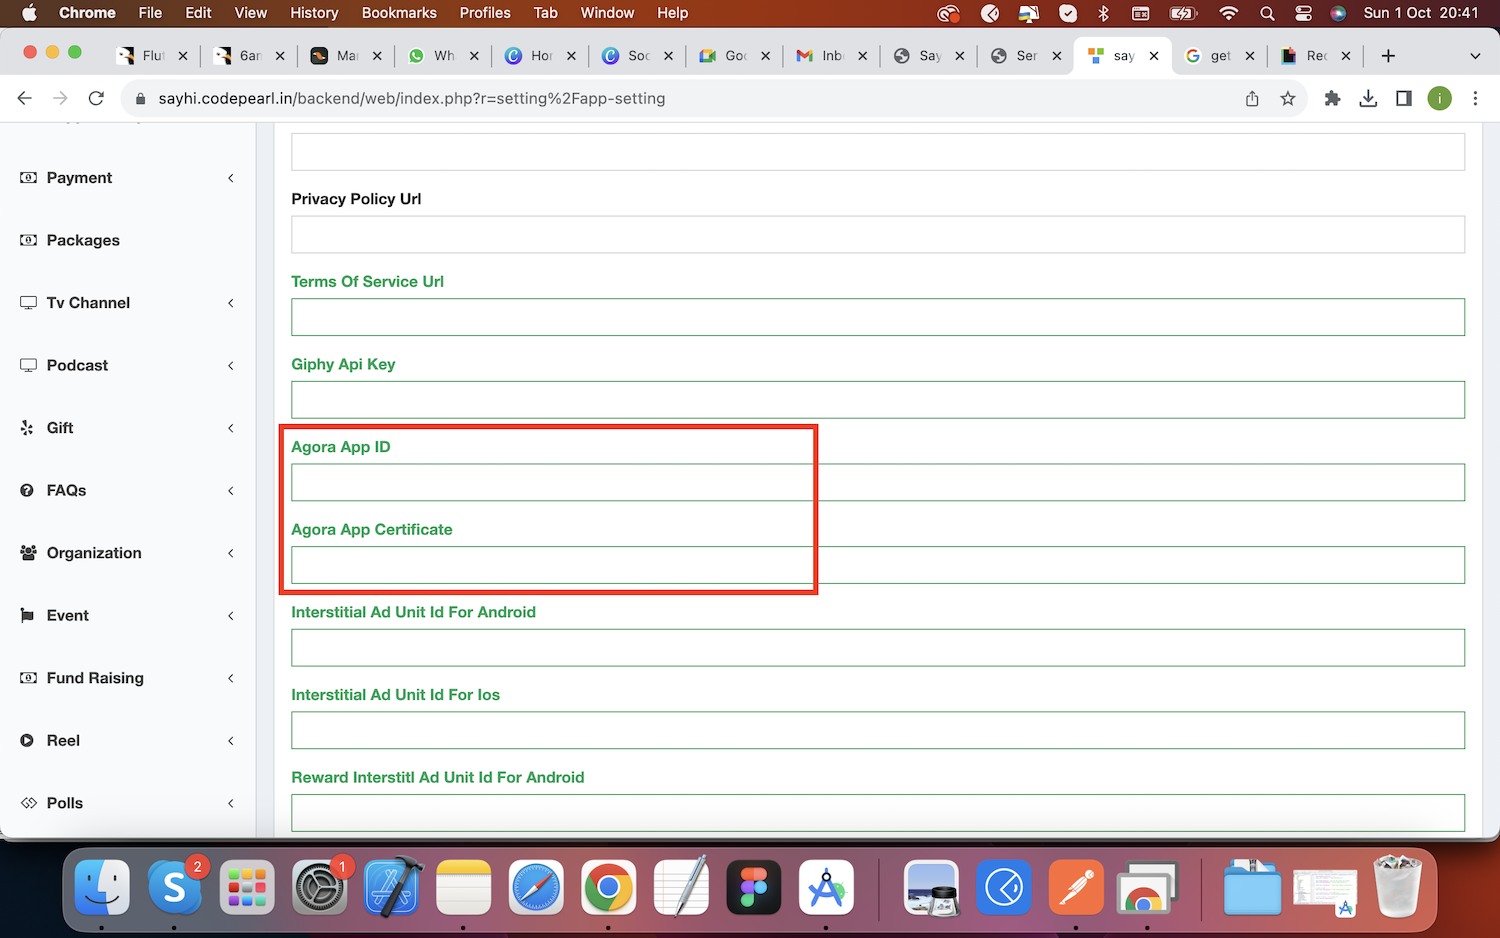
Setup Agora api key for audio video calling
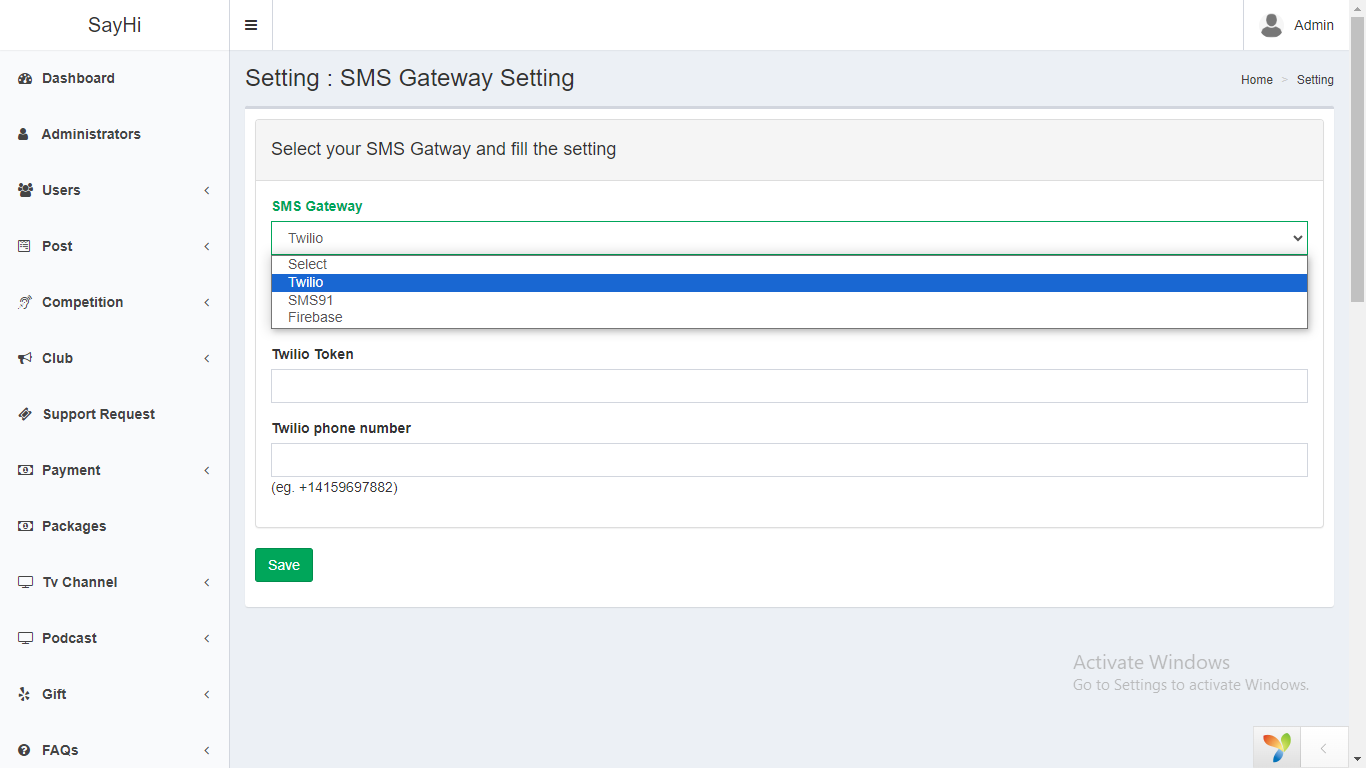
SMS Setting
We are giving following three SMS Gateway integration options to send SMS
- Twilio
- sms91
- Firebase
- Vonage
Nodejs Chat Socket Setup
We are using nodeJs socket programming for chat, Use following instruction
for chat socket setup
All nodeJs chat code will be in /chat forder
Nodejs v22.14.0 must be installed on your server
To confirm you have nodejs install, try to run command in your console :
node -vOutput
v22.14.0
It the nodejs is already not install you can install Nodejs with few steups.
Open the ssh terminal
and run following commands:
To get this version, you can use the apt package manager. Refresh your local
package index first:
sudo apt updatesudo apt install nodejsnode -vOutput
v22.14.0sudo apt install npmYou can update configuration filechat/config.json with given
fields
{
  "port":4000,  //server port
    "live":{    // add your db information
      "host": "127.0.0.1",
      "user": "######",
      "password": "######",
      "database": "#######"
    },
    "dev":{ // leave it blank
      "host": "####",
      "user": "#####",
      "password": "####",
      "database": "###"
    }
  },
  "encryptionKey":"##########################", // enter key for encryption chat eg. bbC2H19lkVsQDf74rtNMQdddFloLyws
  "storageUrl":"",  // Leave it blank
  "pushNotification":{
      "databaseURL": "https://q#############.firebaseio.com"         See here
  },
  "voipNotification":{                                               Check documentation to create
    "key": "cert/AuthKey_#####.p8", // .p8 file
    "keyId": "########", //67J4MZG469
    "teamId": "########", // T937GPNTUY
    "bundleId":"###########"  //com.example.app
  },
  "sslCertificatePath":{
    "isSsl":true,   //if ssl not available then make fasle
    "key": "############/##privkey.pem",     // ssl key certificate path
    "cert": "##############/##fullchain.pem" // ssl certificate path

  }
Step 3
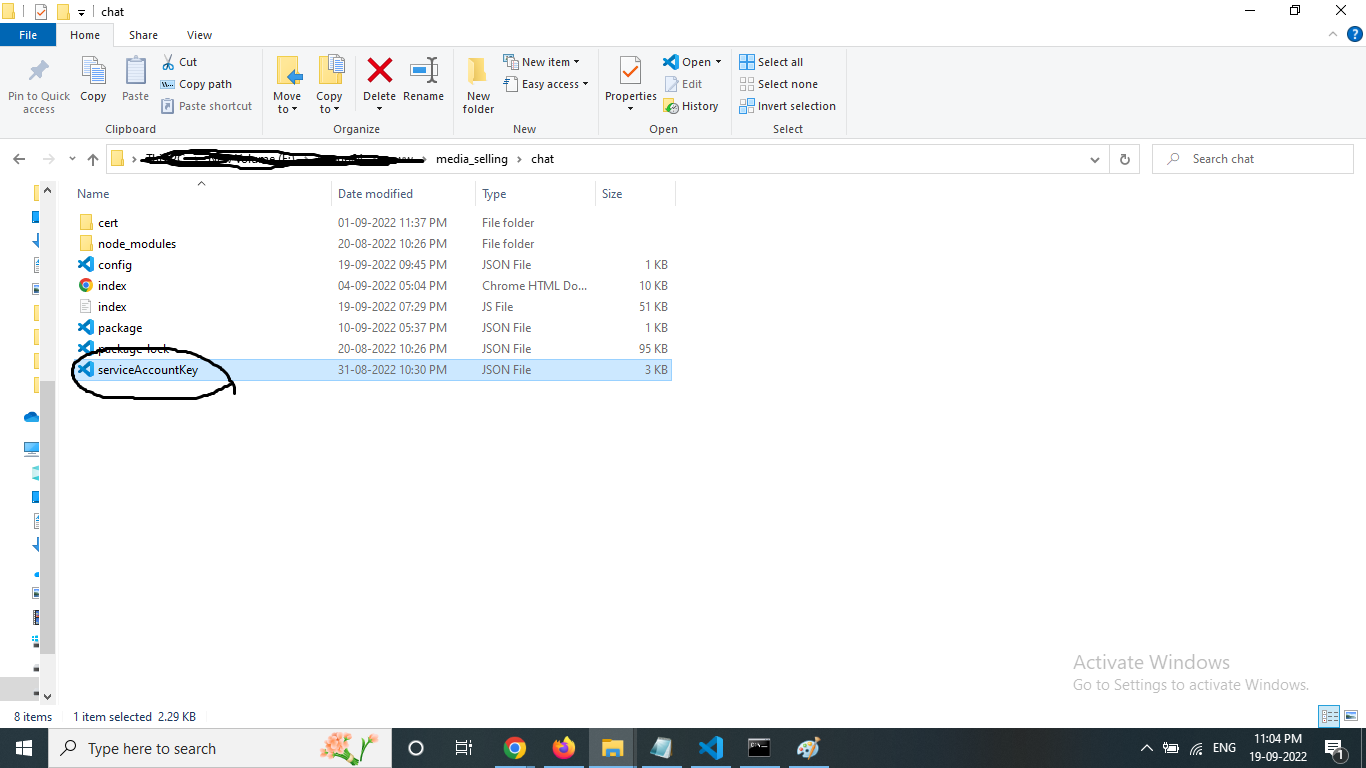
Firbase Setup
serviceAccountKey.json
and put the file in
/chat folder
 Step 4
Start node server
After installing all dependencies and updated the configuration, you must
start node server :
Open a terminal and nvigate to the /chat folder that contain
the file "index.js"
Run following command to start server :
          cd /path/to/your/root forlder/chat
          node index.js
For running server all time you can install pm2 package More Detail
Run following command to run server with forever:
          cd /path/to/your/root forlder/chat
          pm2 start index.js
Project access URL
Admin Panel
Admin Url :youdomin.com/backend/web/index.php Login information :
Username : admin
Password : 123456
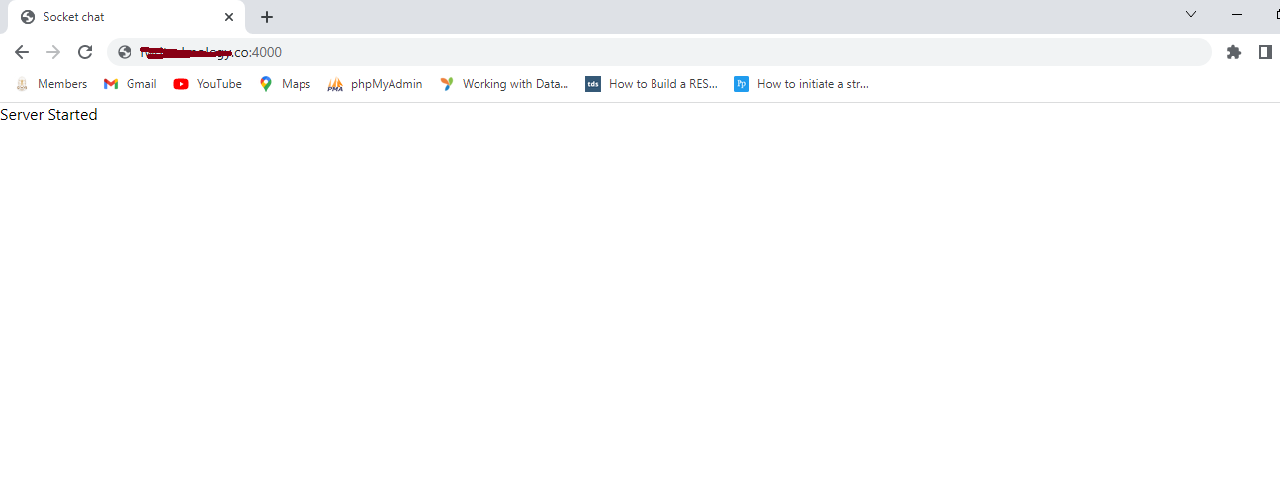
Socket Url (socketApiBaseUrl)
https://yourdomain:4000
Rest API Endpoint Url (restApiBaseUrl)
youdomin.com/api/web/v1/API name will be added in the last of above api endpoint url. This will be done on the mobile side by programming. suppose if we need to call categories api, then mobile application is calling following url with adding api name "categories" like :
youdomin.com/api/web/v1/categories
if the above url is working then Rest api setup successfully.
iPhone app setup
Step 1Go to developer.apple.com and login using credentials Follow the instructions given in the link below to create bundle identifier.
https://www.appcodezip.com/2020/05/app-id.htmlKeep note of bundle identifier as we need it in firebase ios app setup and flutter ios app setup.
Step 2
Enbale apple pay and push notification
Your need to enable push notification and apple login option in create identifer that you created in step 1. See below screenshot for refrence

Step 3
Setup iOS app source code

Change bundle identifier
Replace the bundle identifier with your created bundle identifier above in ios app setup in apple developer account
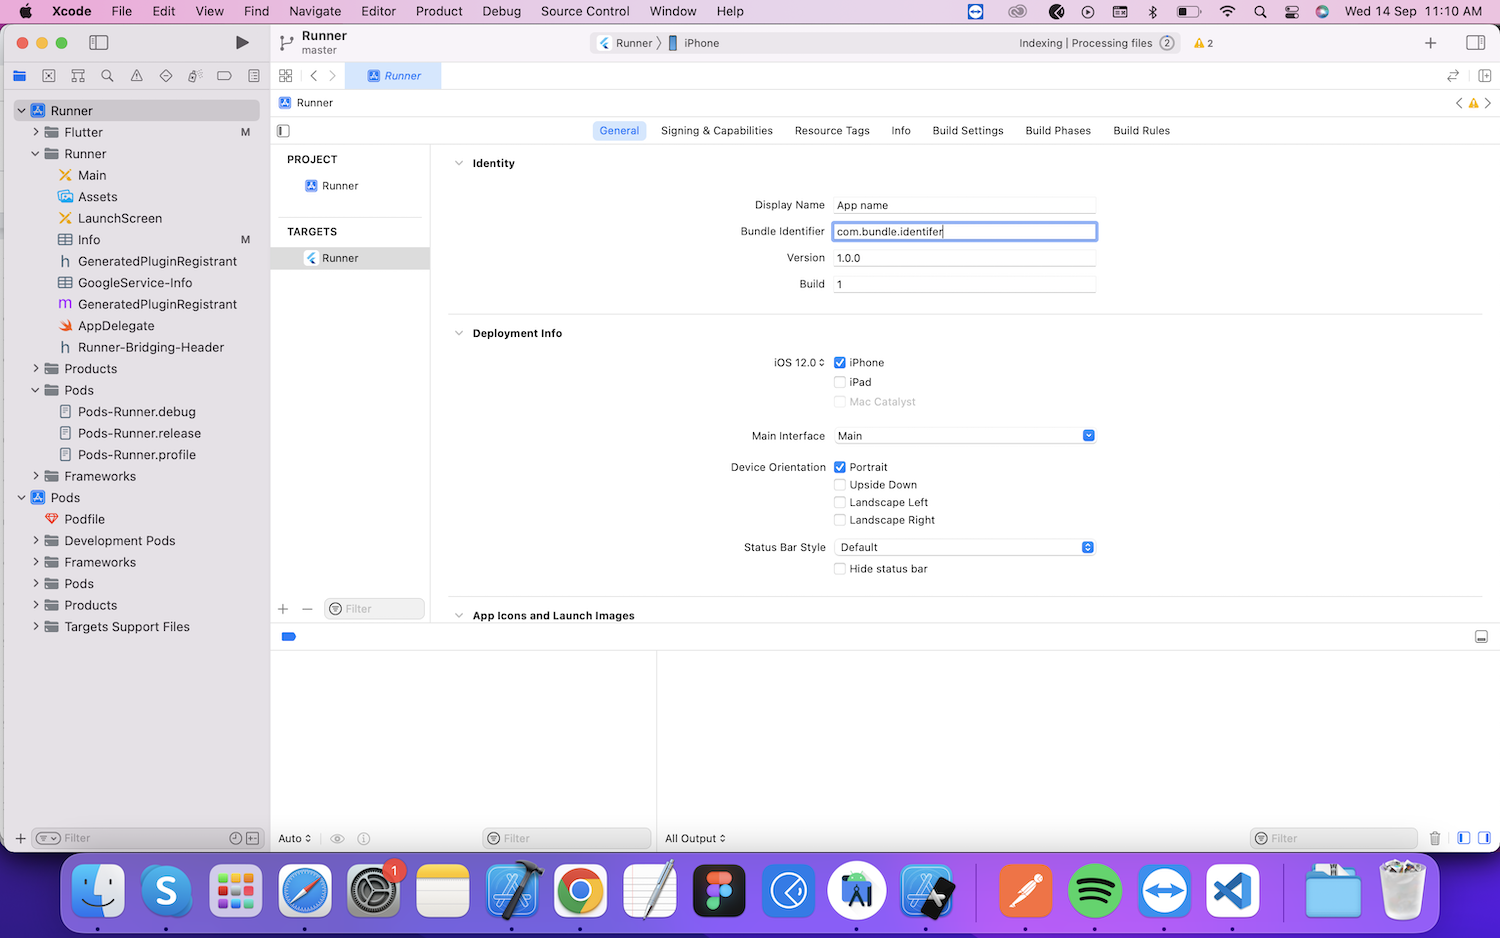
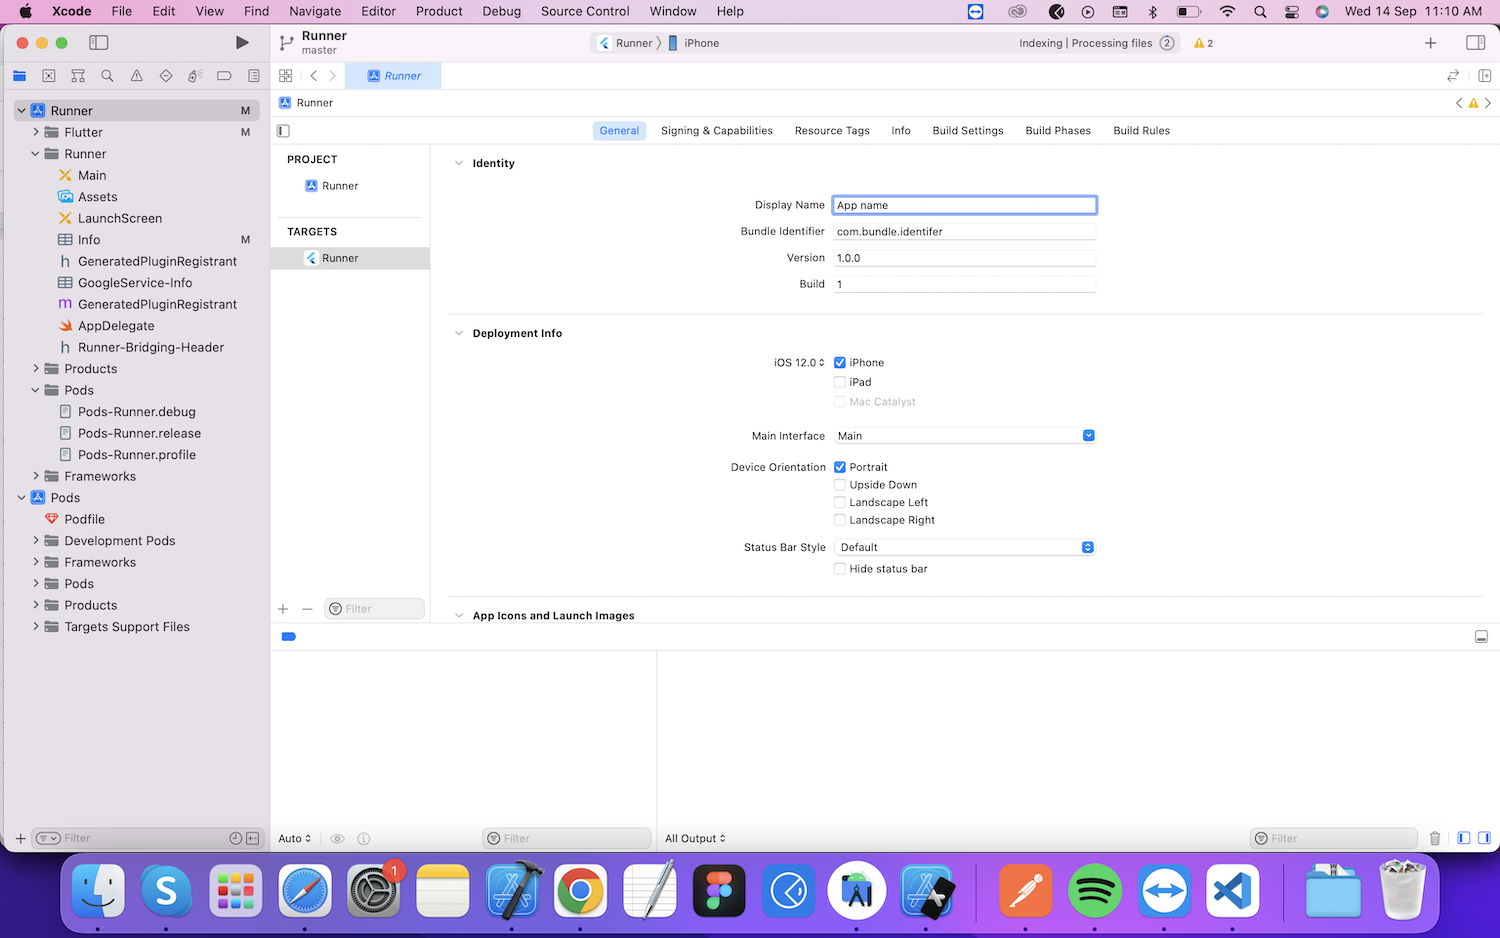
Change app name
Add new app name in display name field
Change app icons
Go to "Assets.xcassets" folder and replace app icon as shown in below screenshot
![]()
Android app setup
Step 1Replace package name
Open the "build.gradle" file in android code, Replace the package with your own created package name as shown in below screenshot.

Change app name
Step 2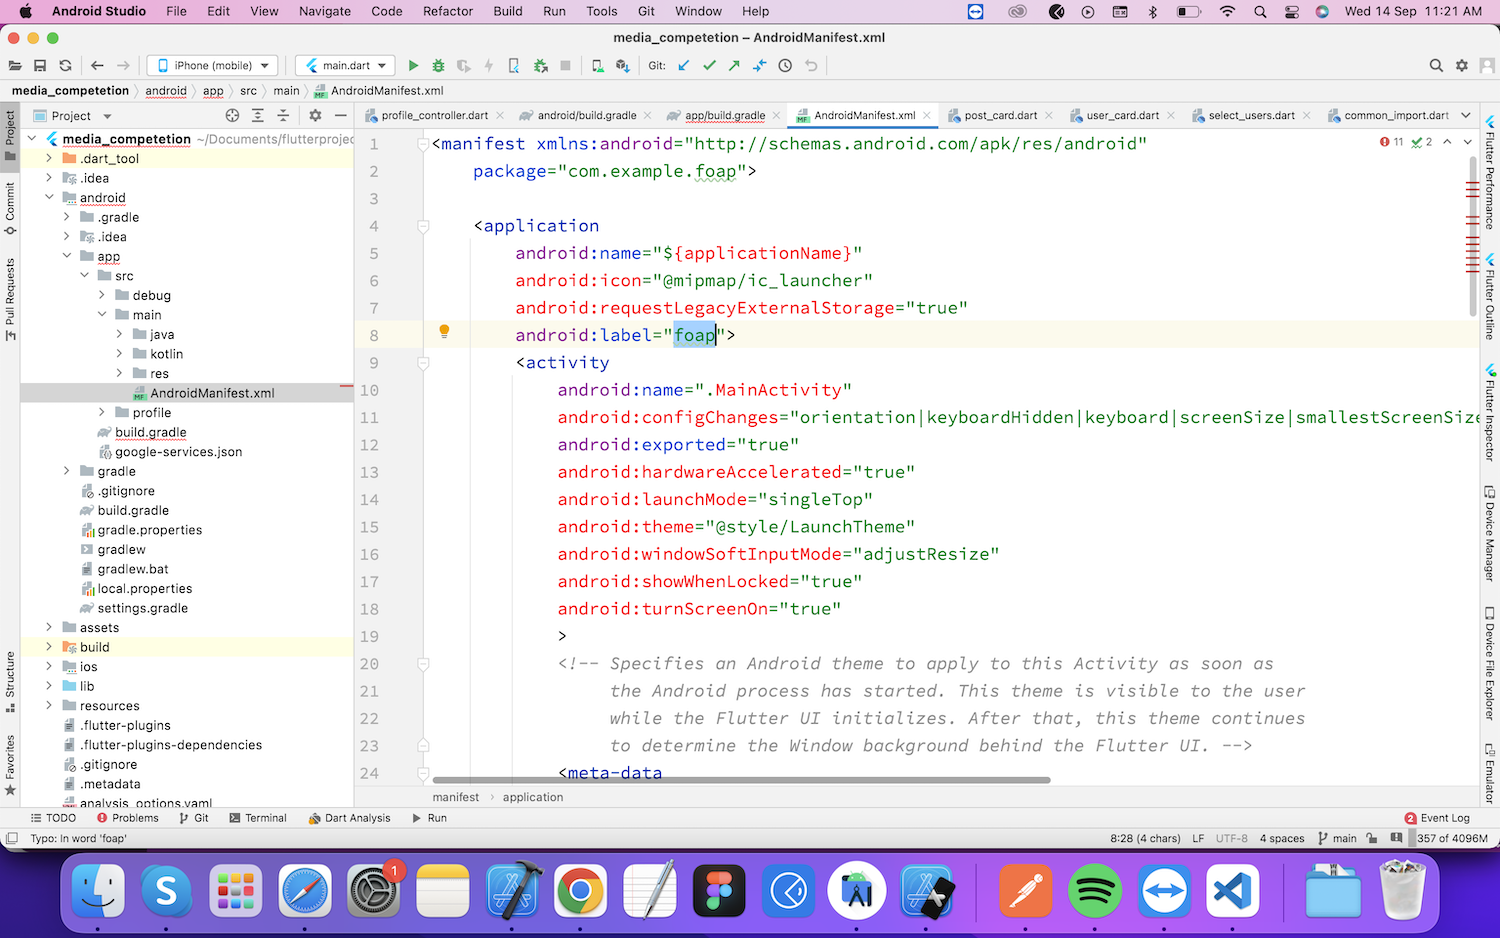
Change app icons
Step 3![]()
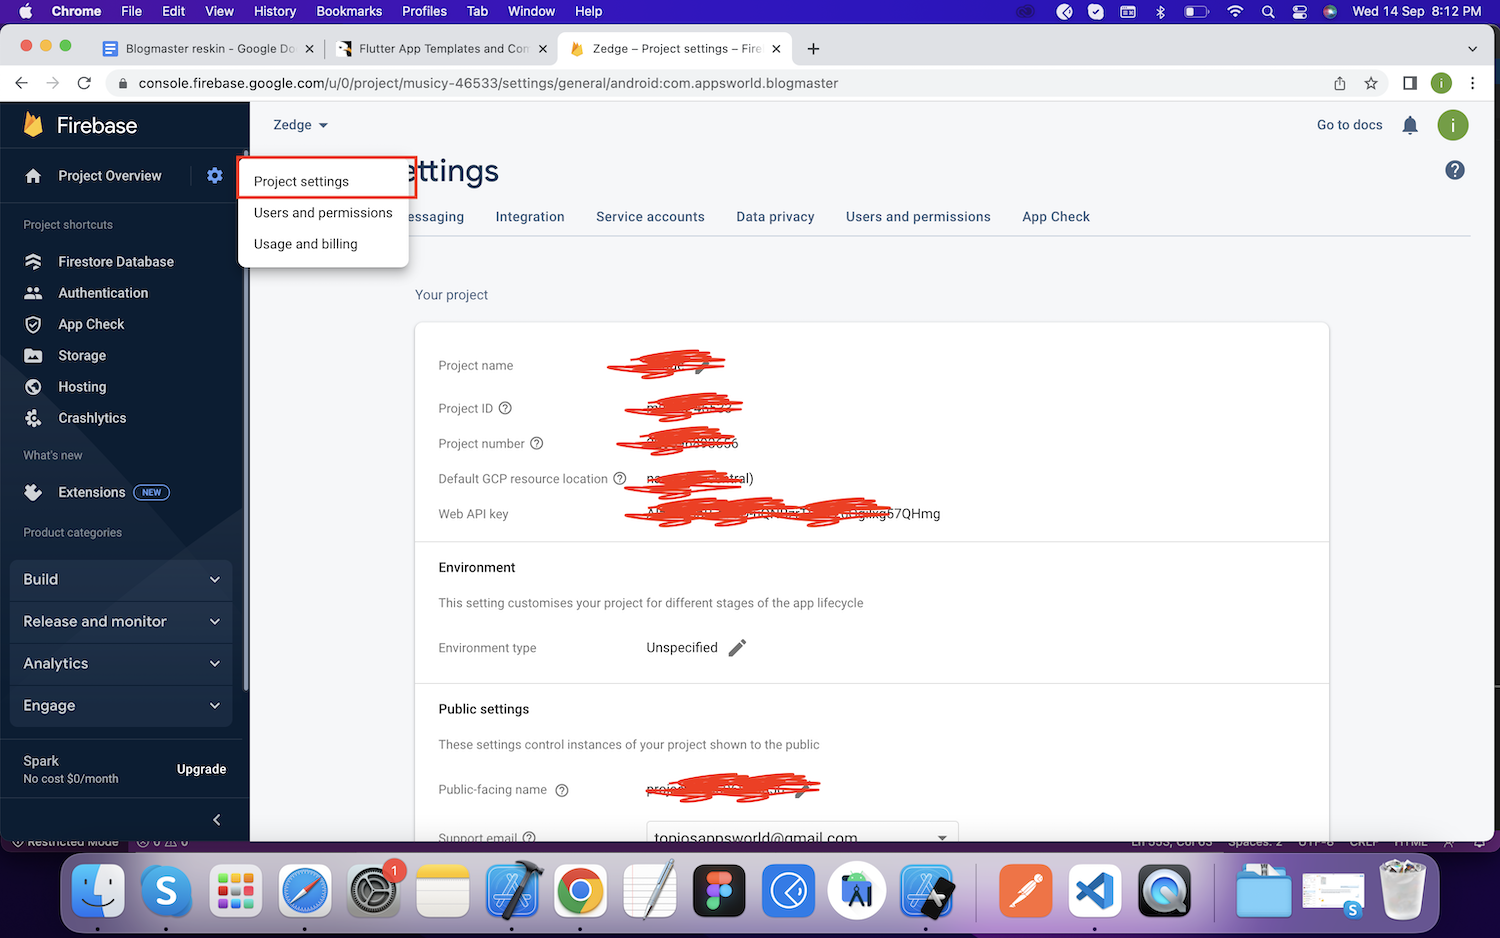
Firebase app setup for social login and push notificatoions
Create new firebase project
Step 1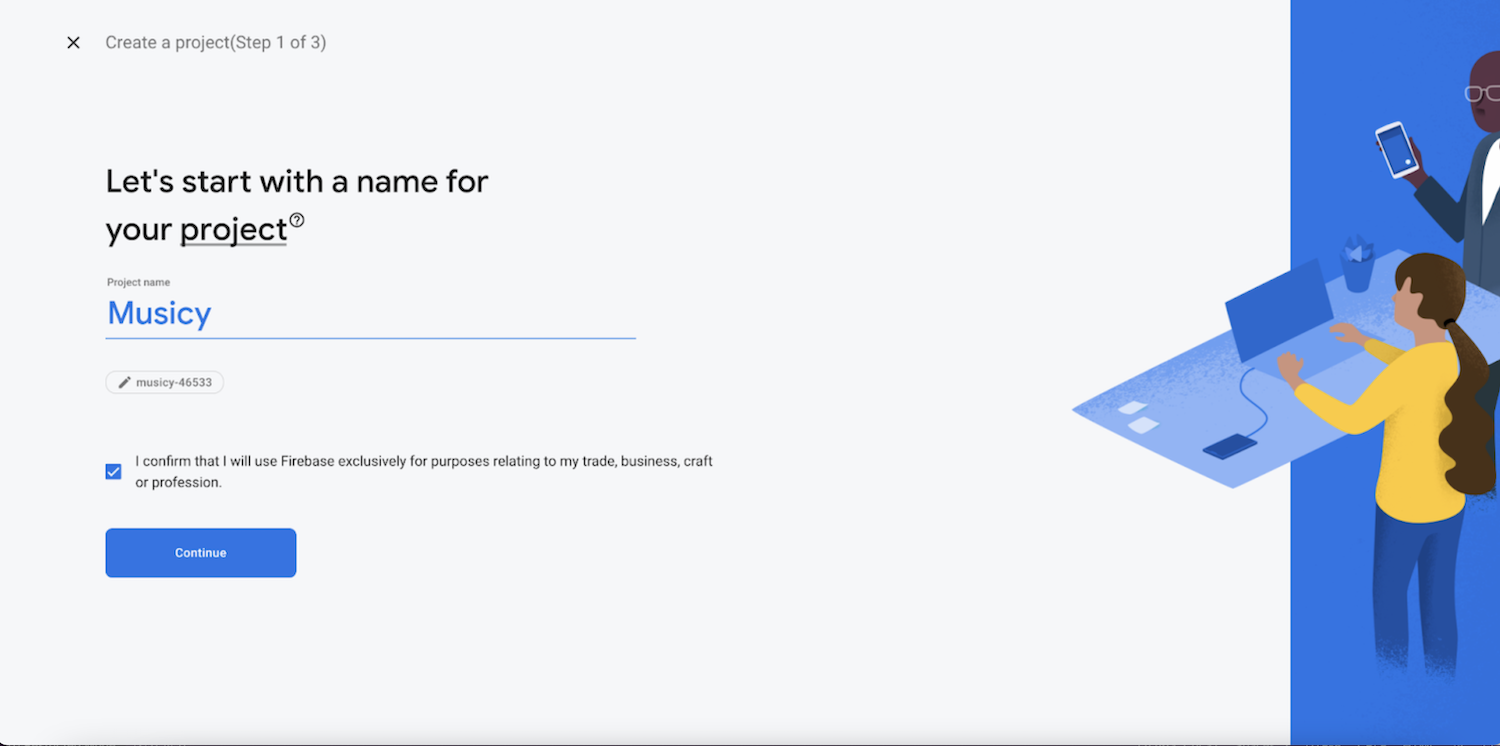


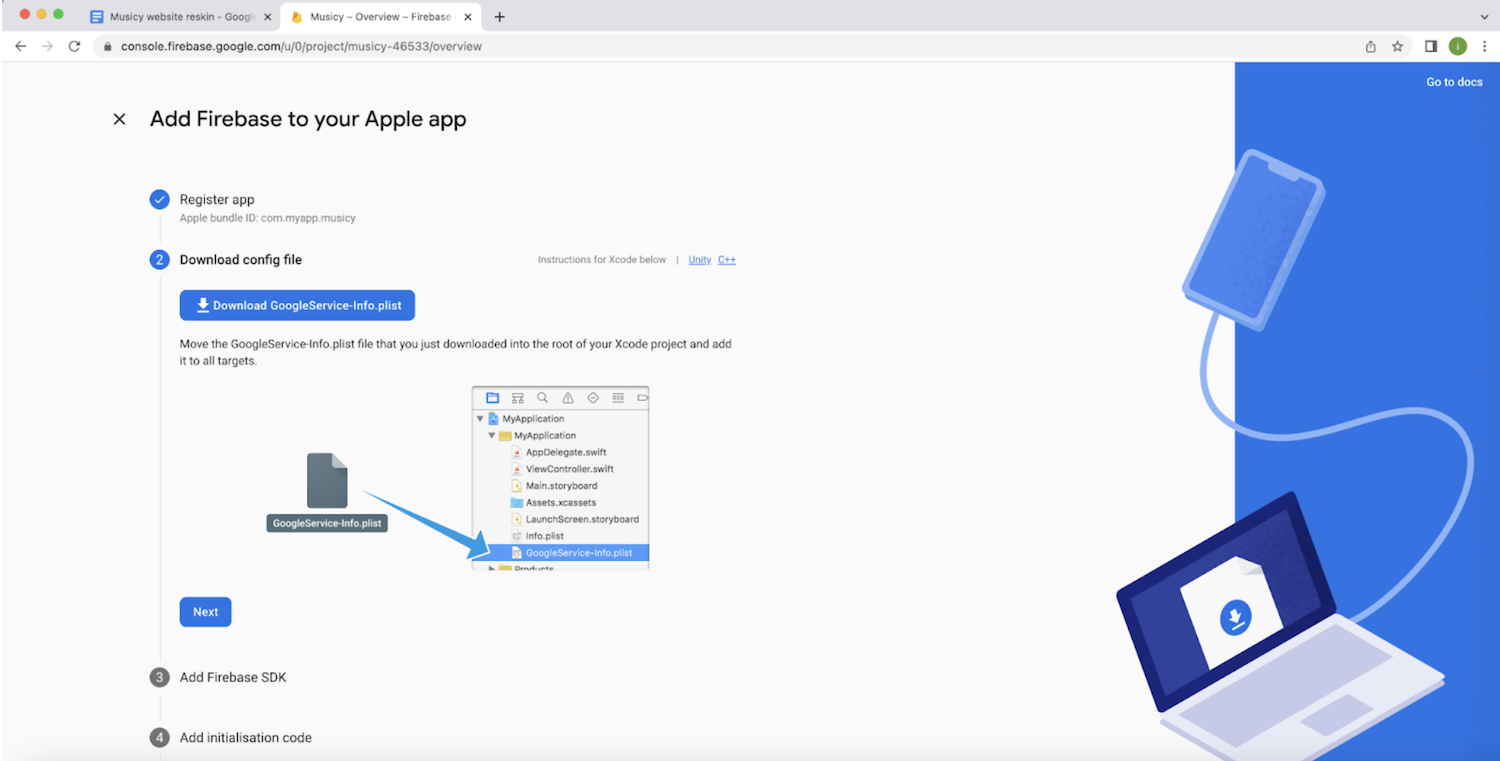
Create iOS app in firebase project
Step 2Follow the below screenshots to Create ios app.

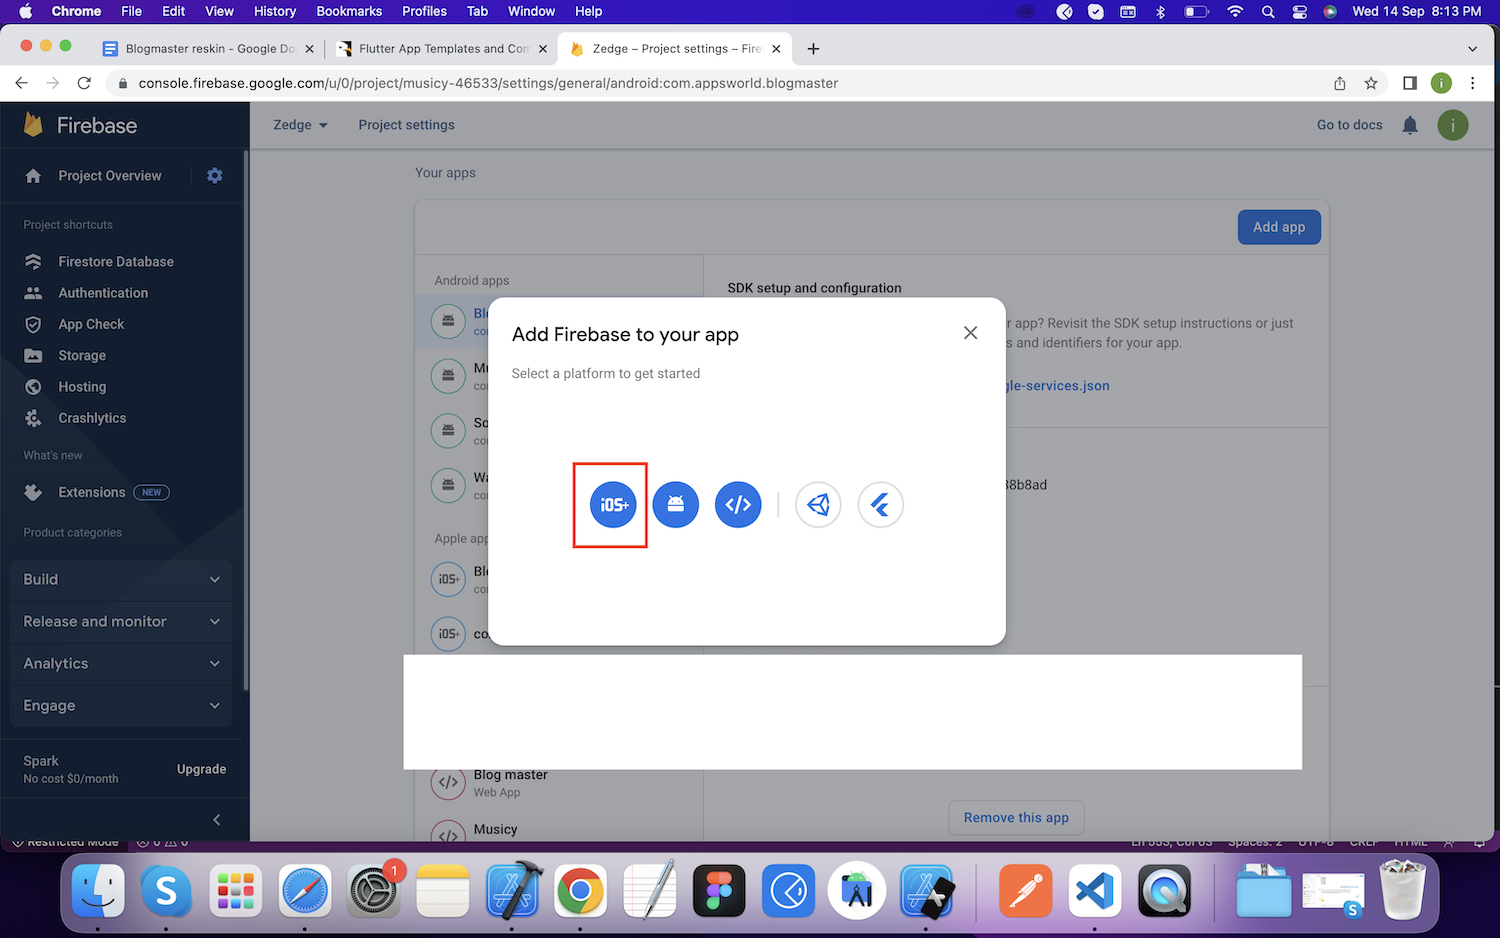
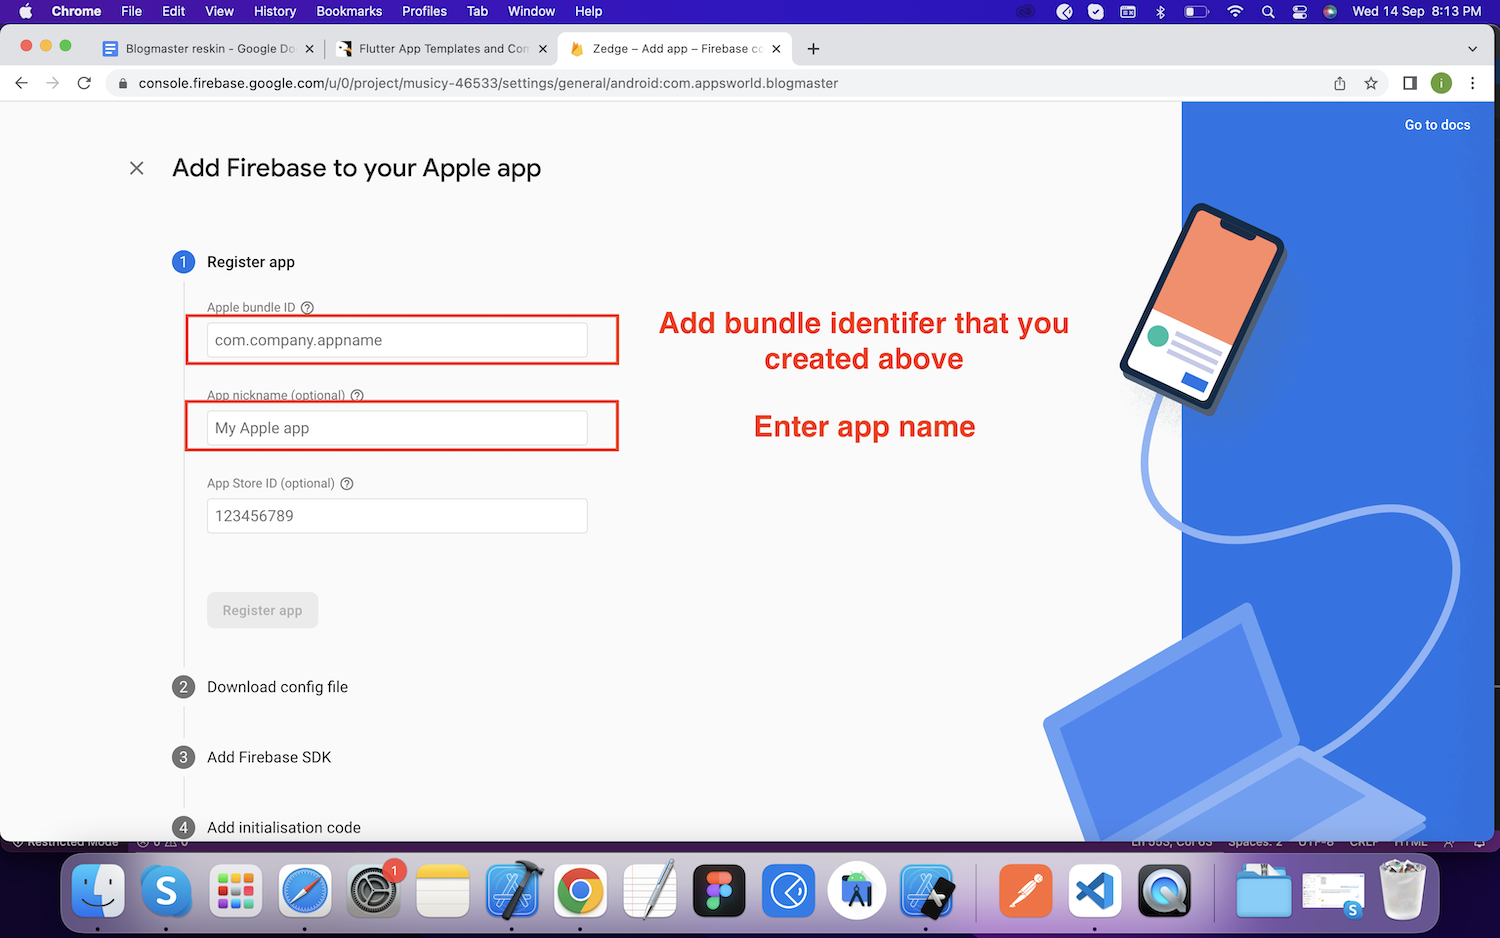
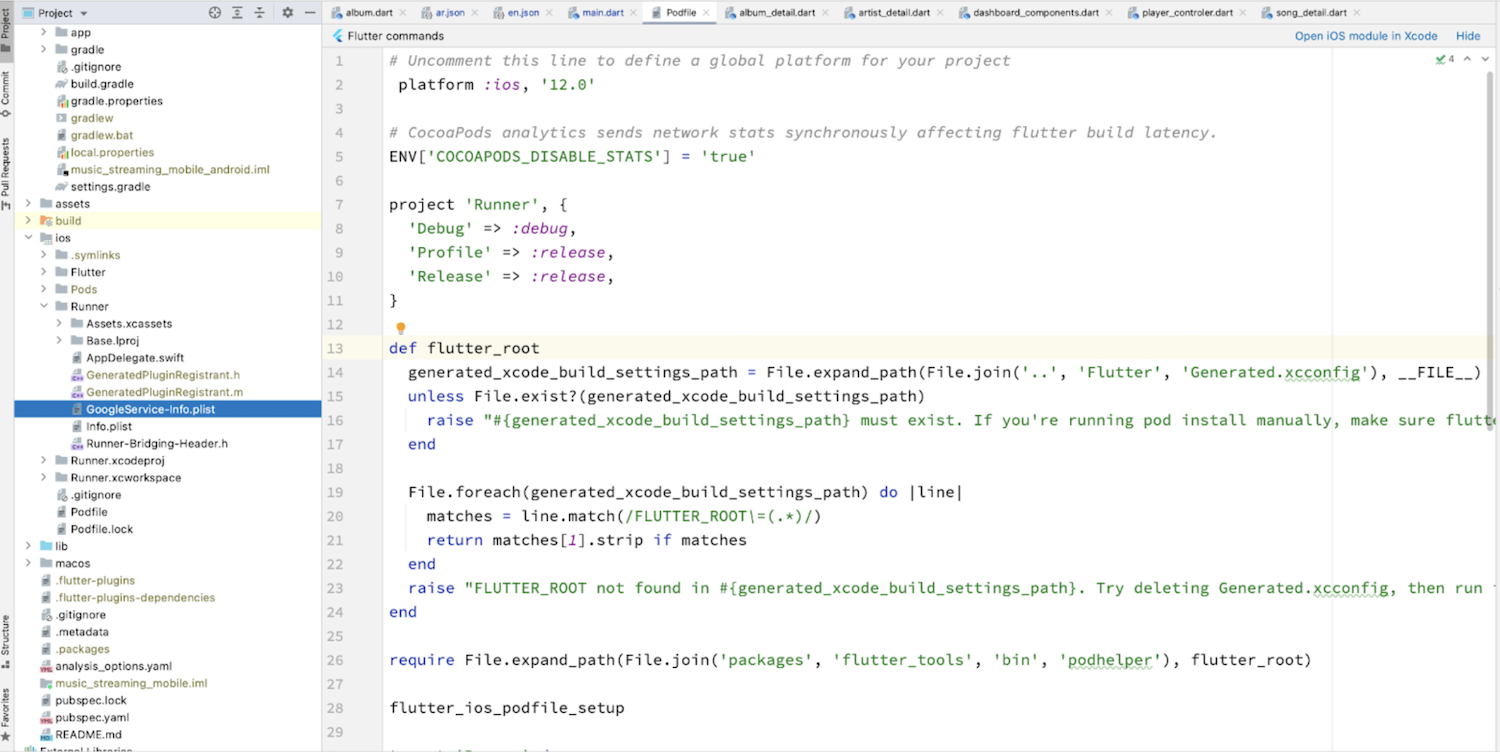
Download the plist file , We will use it later in flutter app.
Create android app in firebase project
Step 3Follow the below screenshots to Create android app.
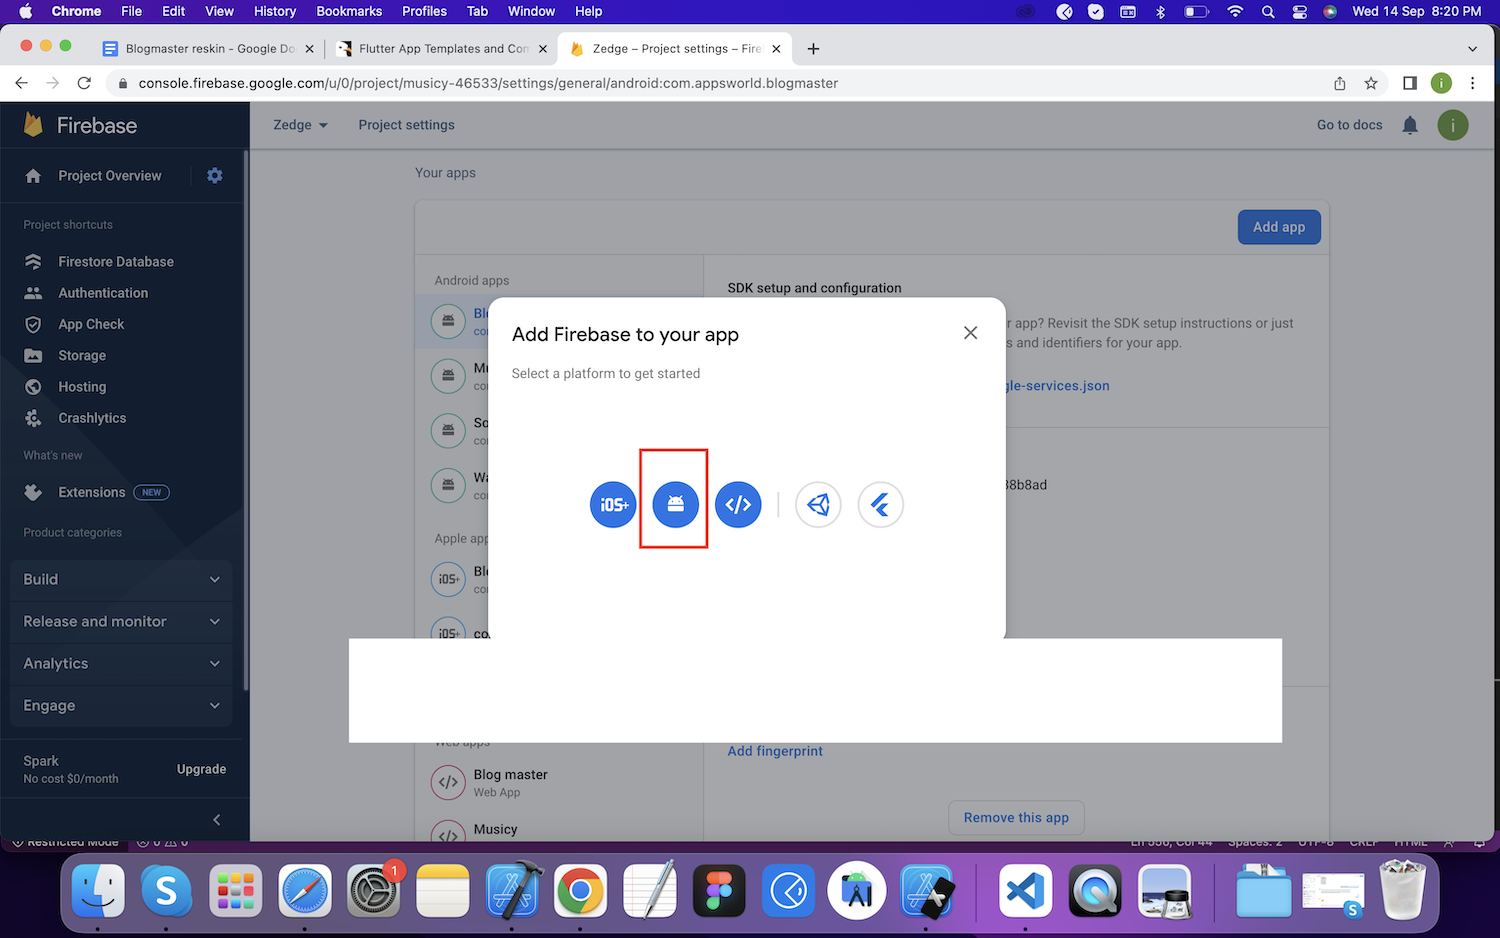

Download the json file , We will use it later in flutter app.

Step 4
Download the service account key and get database url for nodejs setup

Enable social logins
Go to Authentication tab from left menu and click on get started
Google login
Select google sign in and enable it

Link firebase project with source code


Third party api keys
Facebook login setup
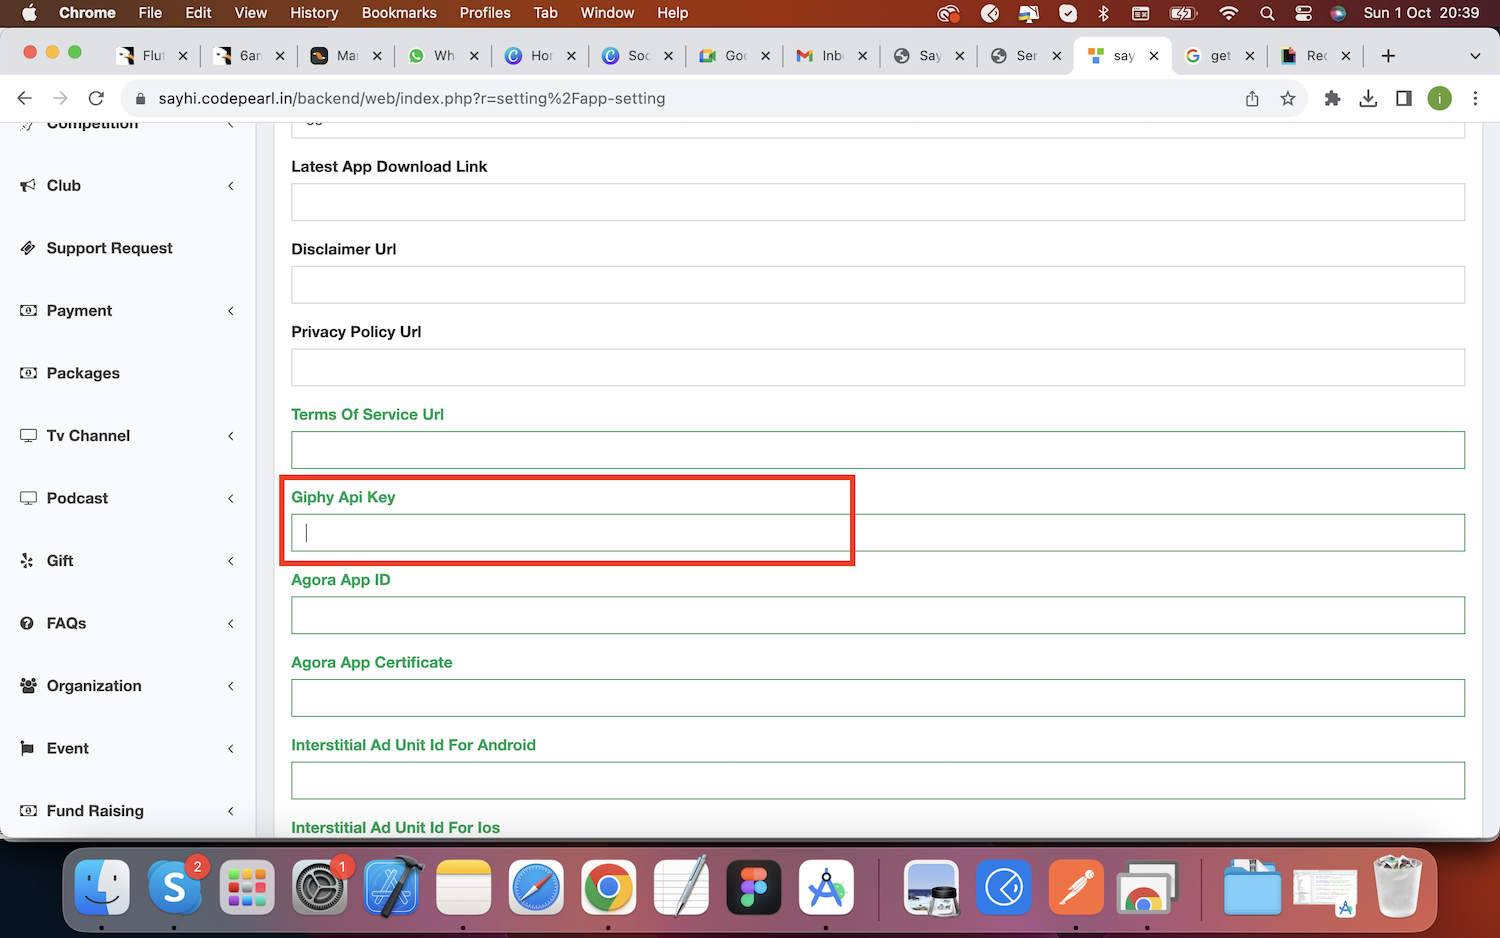
Giphy setup
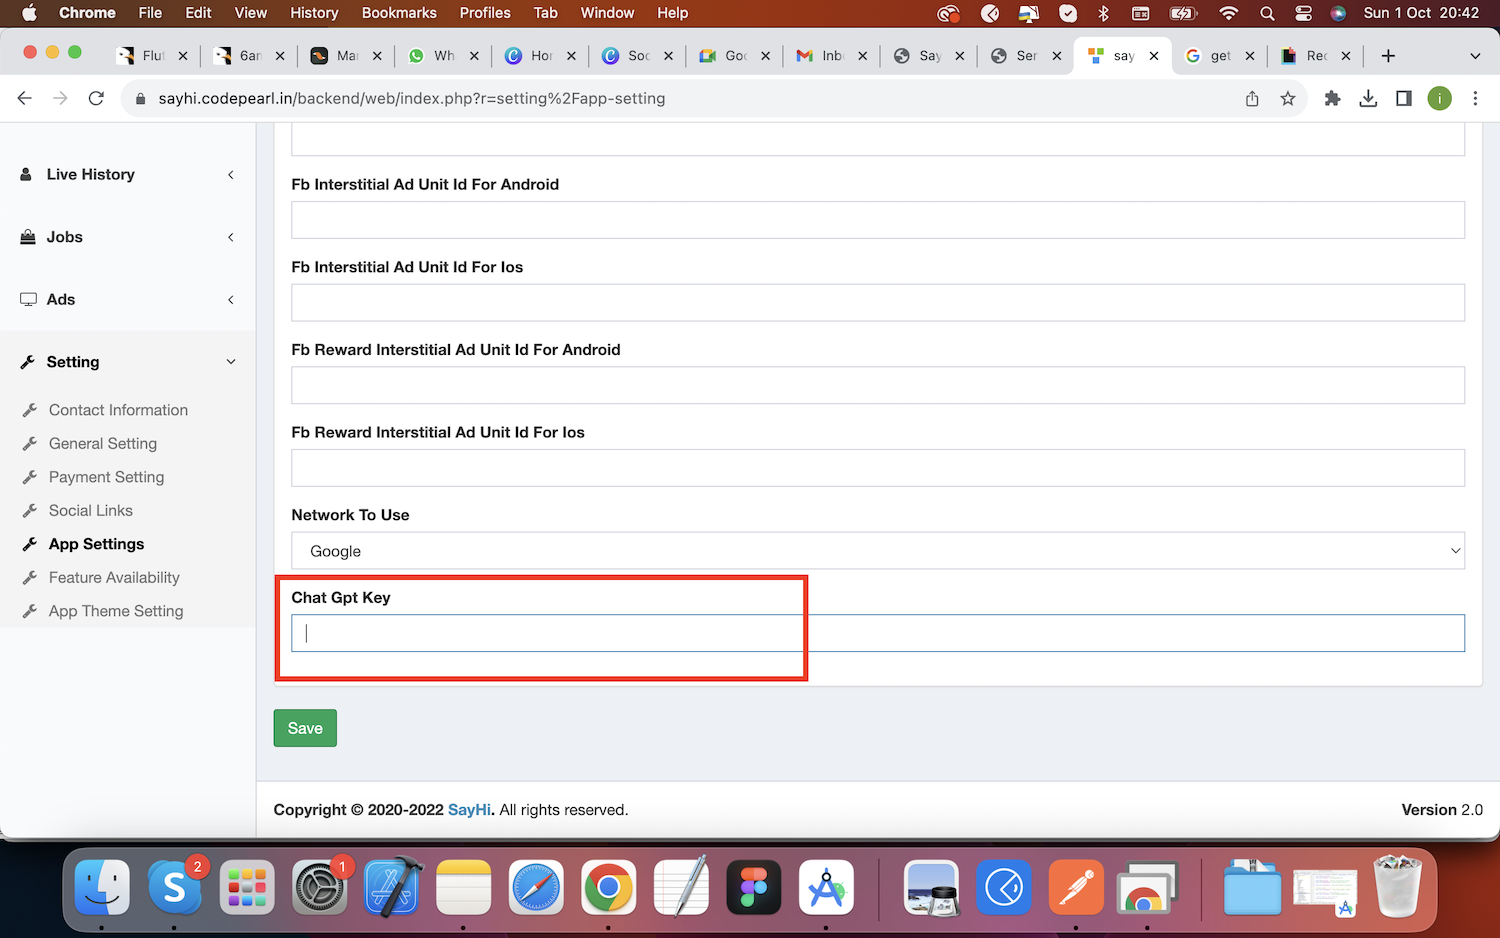
ChatGPT setup
Stripe setup
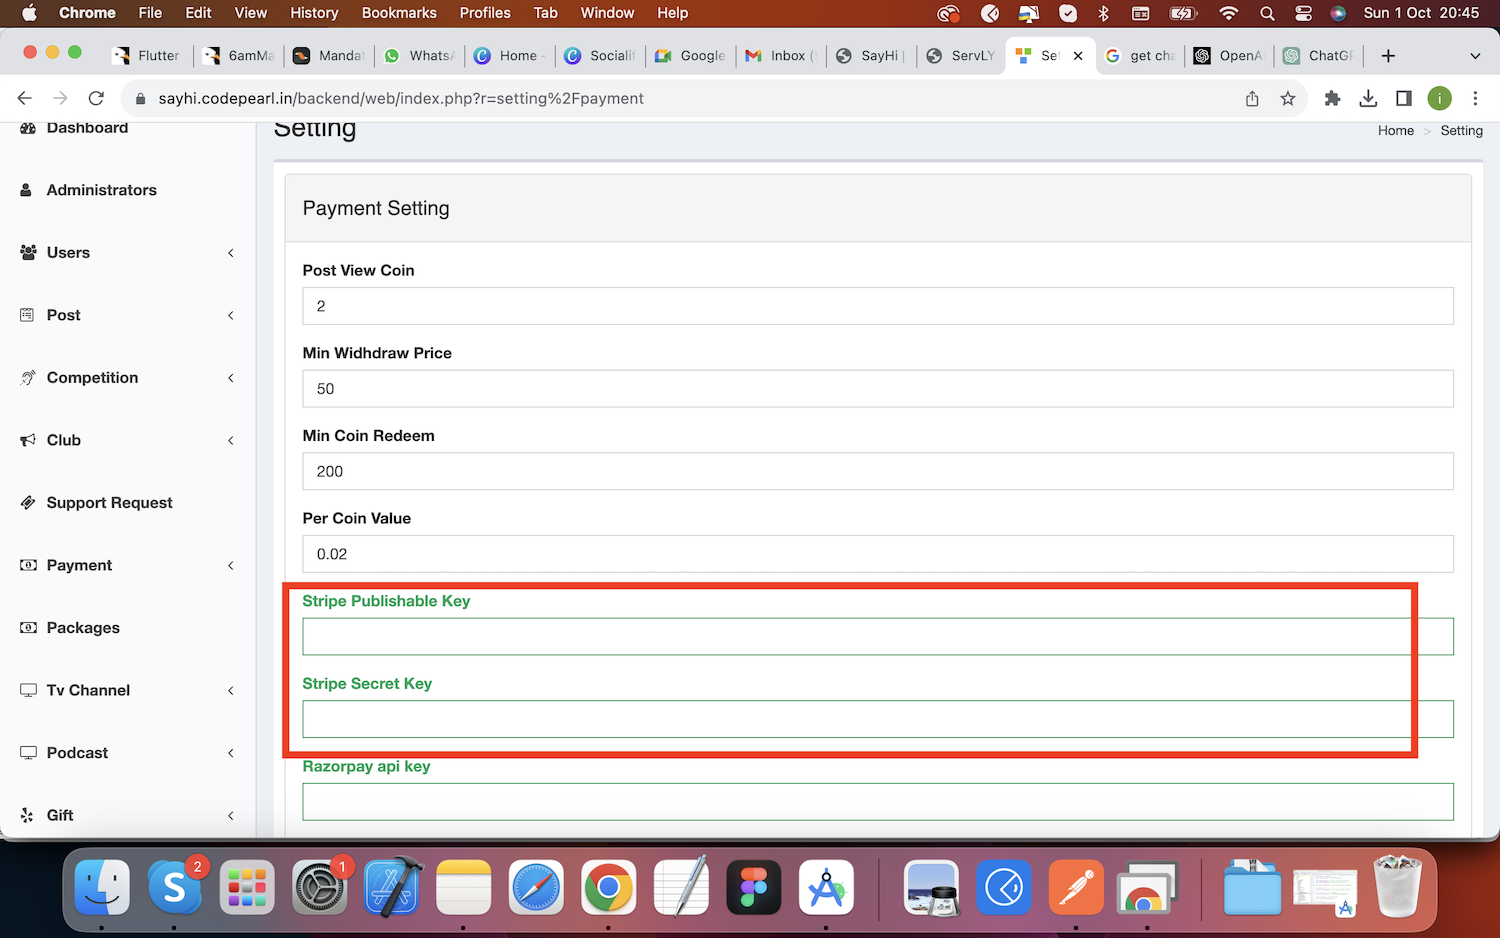
Razorpay setup

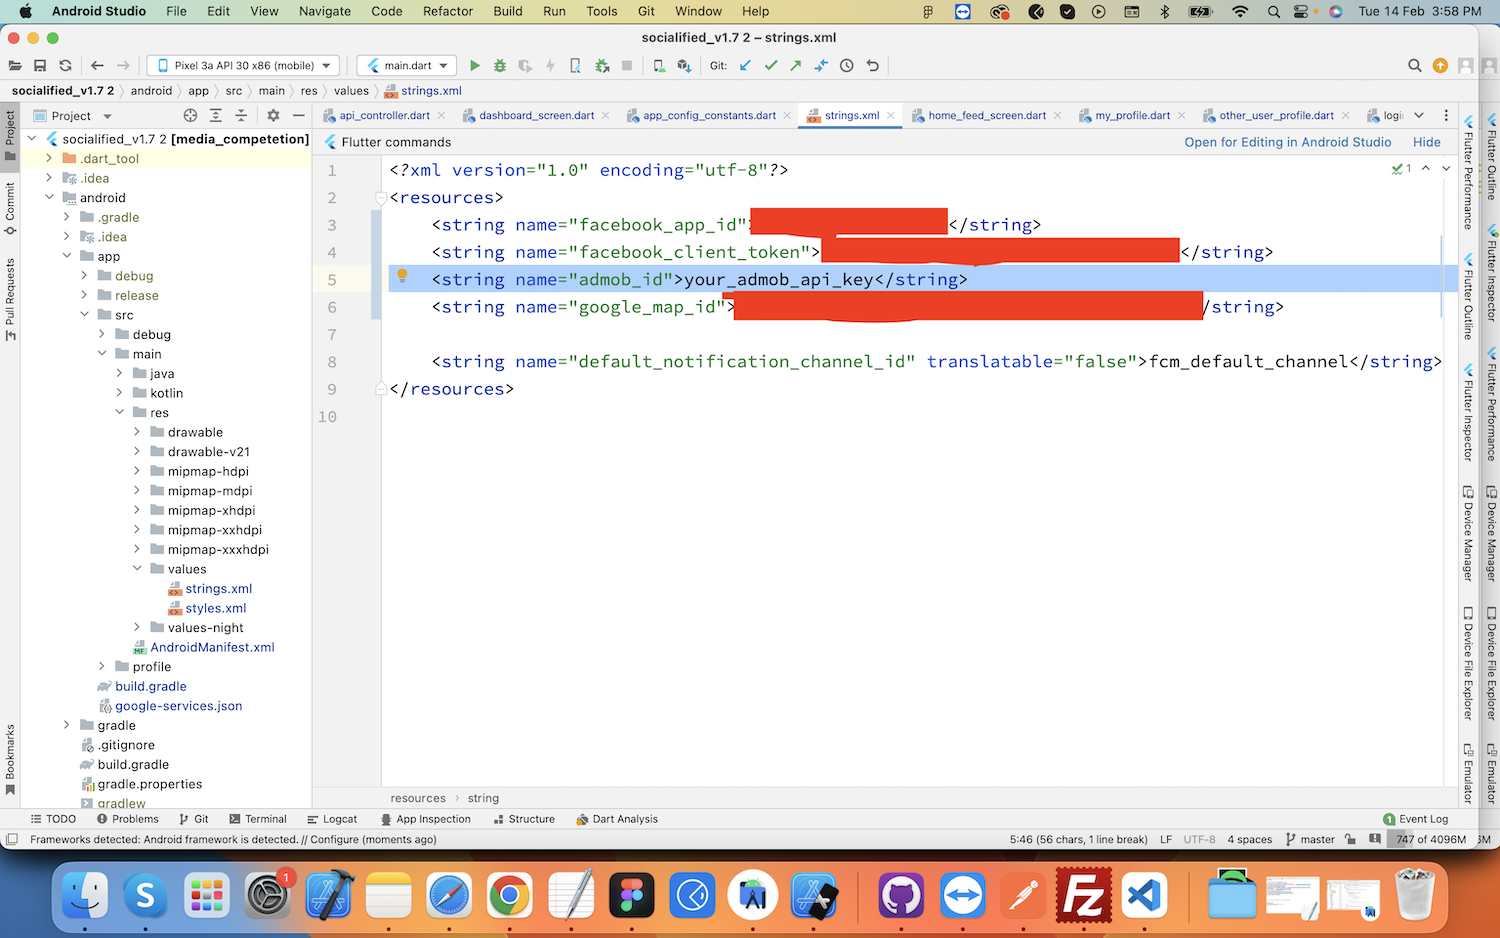
Setup Google map api key for showing google map for location sharing in chat


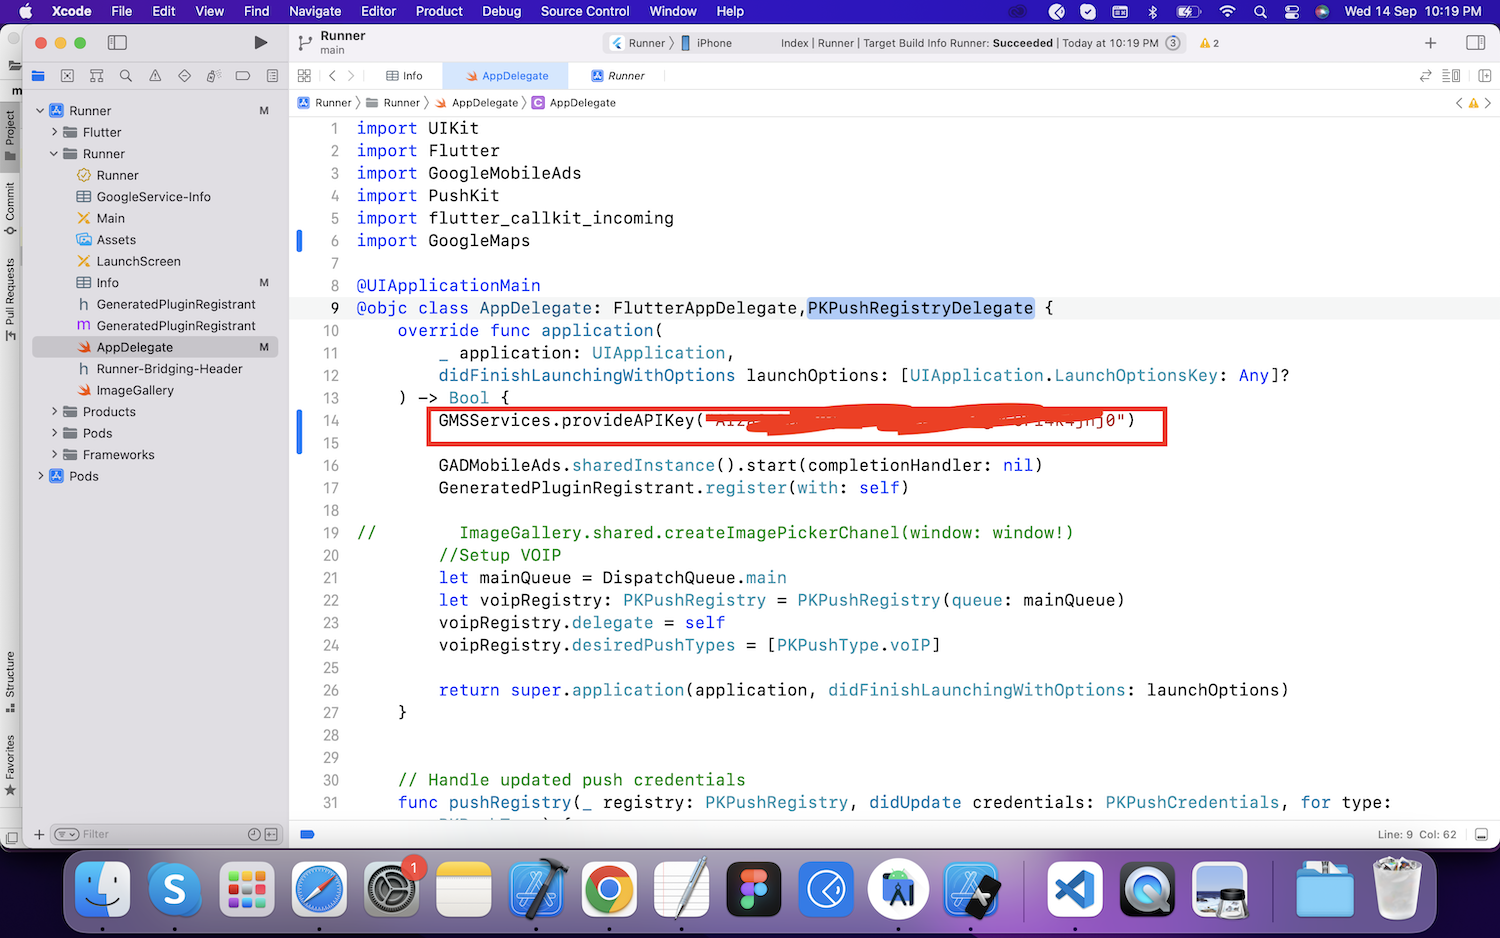
Setup Google Admob api key for showing google ads

Share links setup (Post, event, live etc share links)
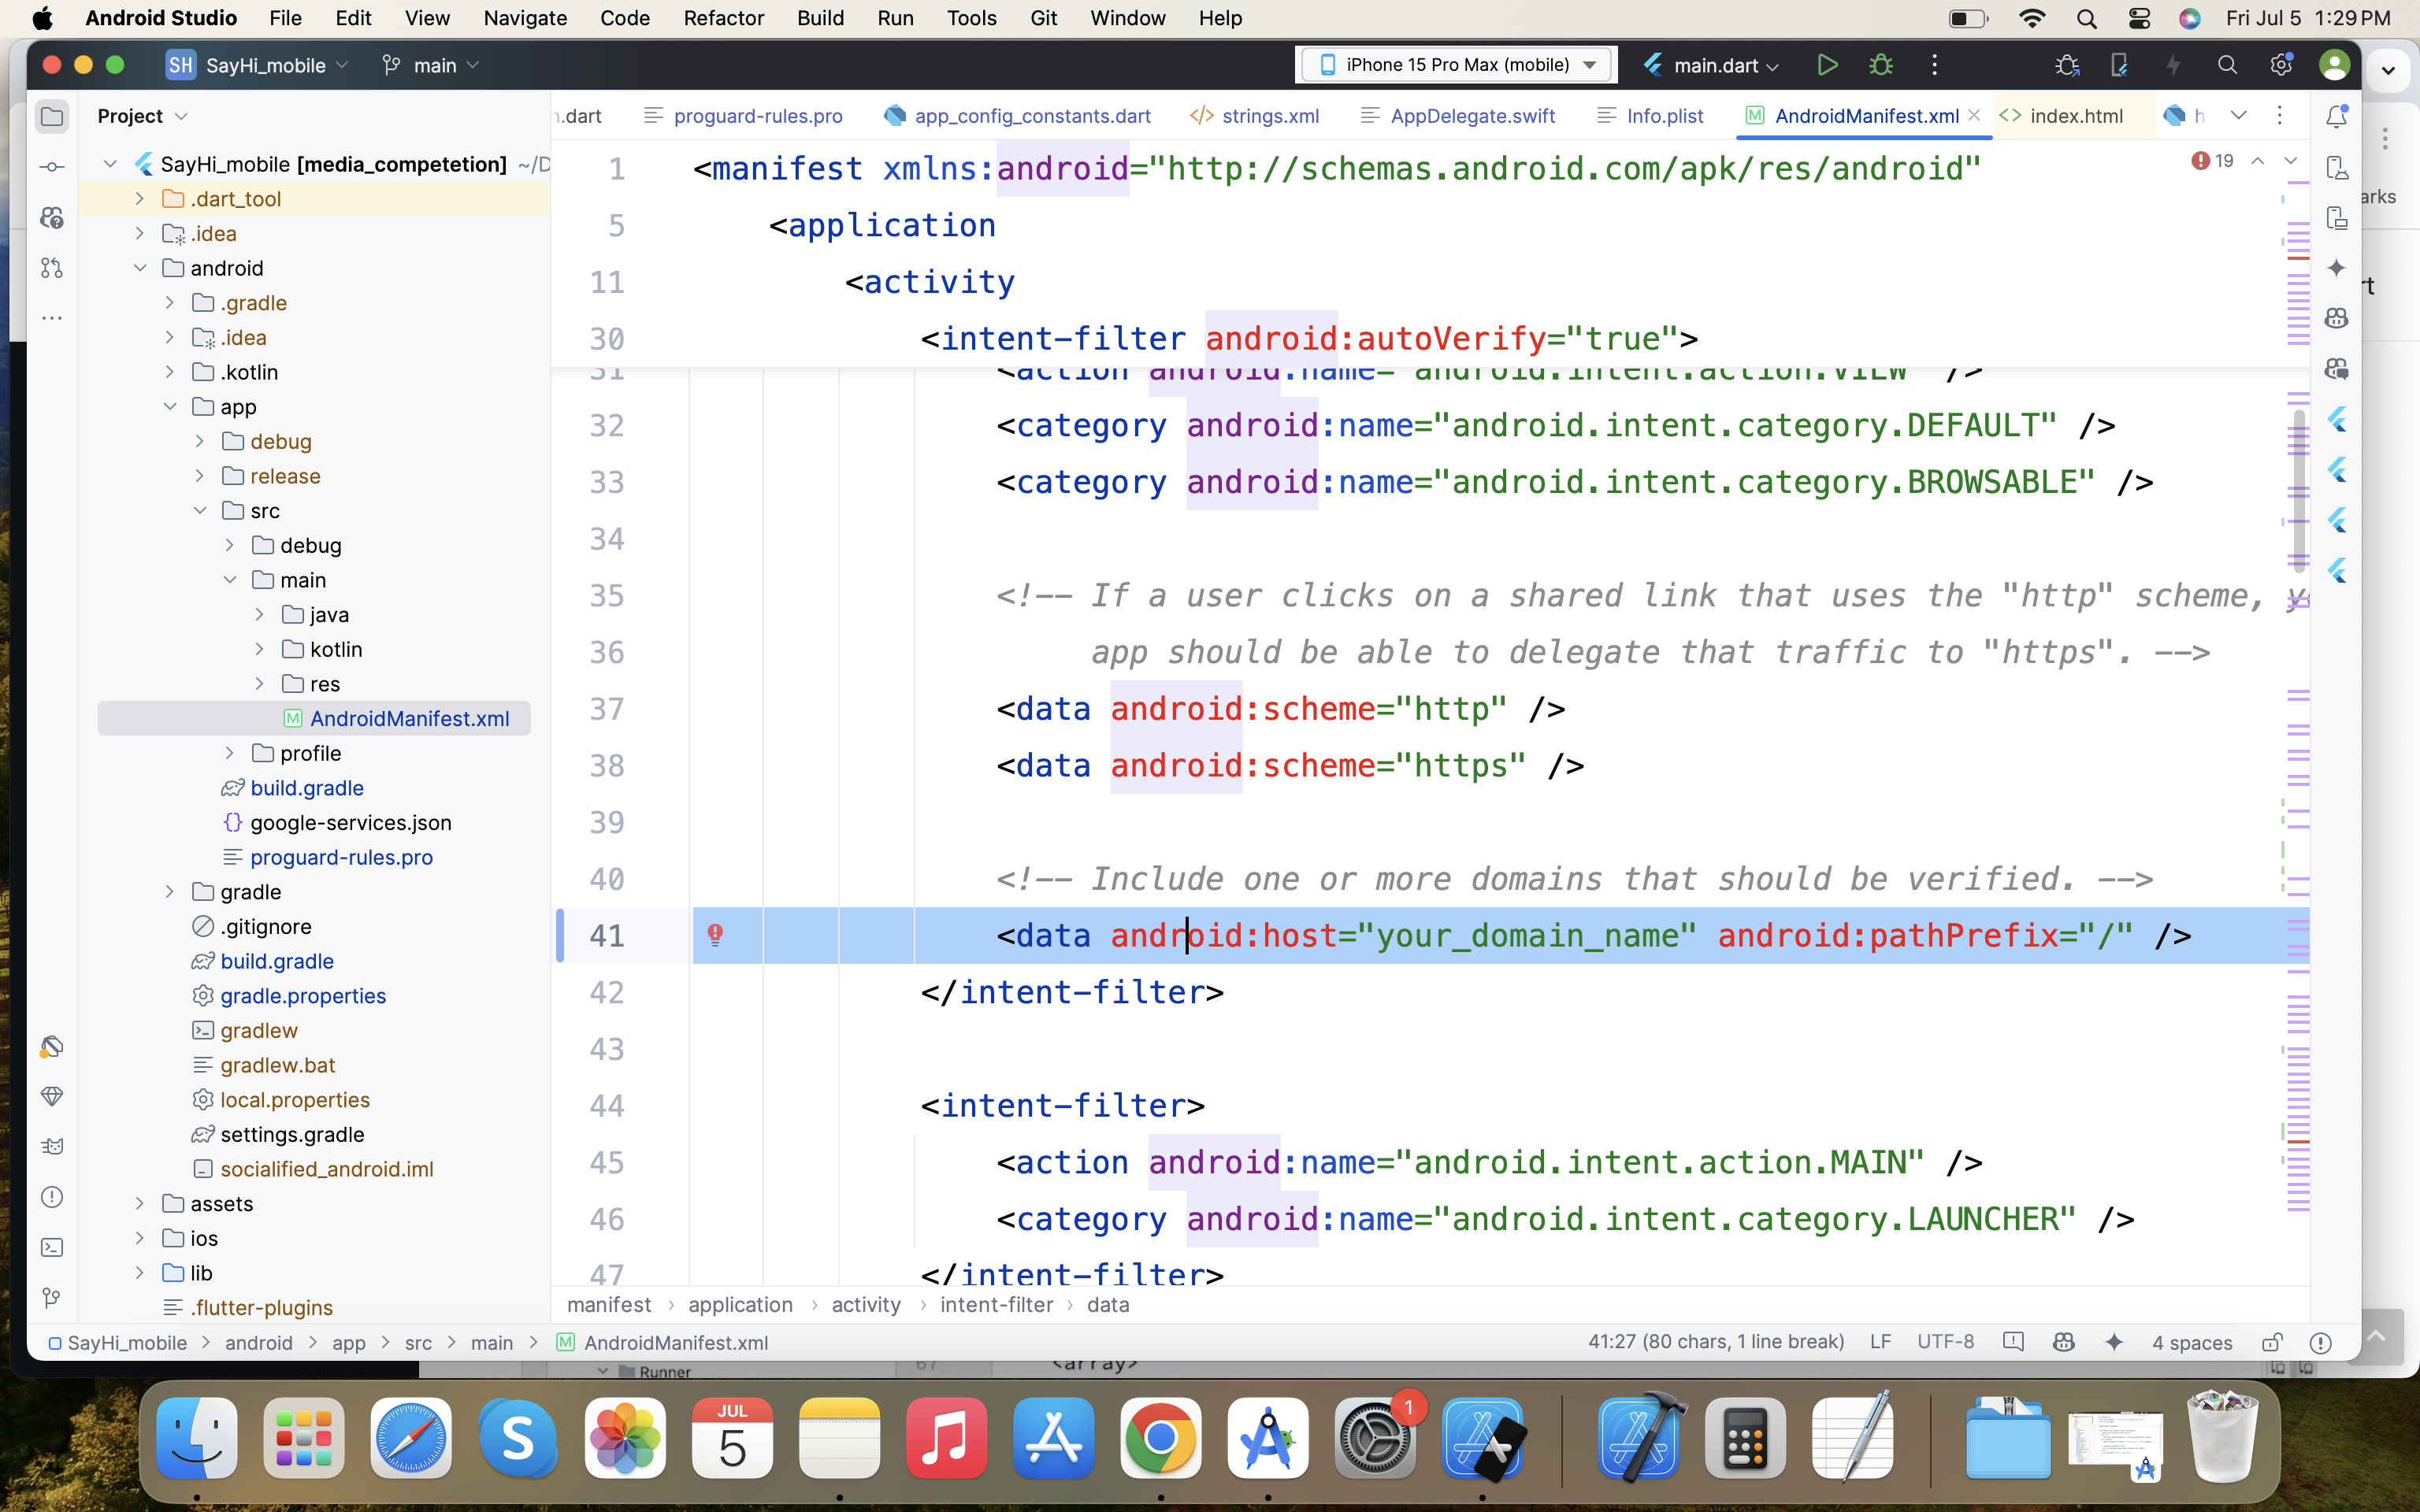
Go to android/app/src/main/AndroidManifest.xml
Go to tag '' as shown in screenshot
Replace your_domain_name with your domain like instagram.com, dont add http or https, or www
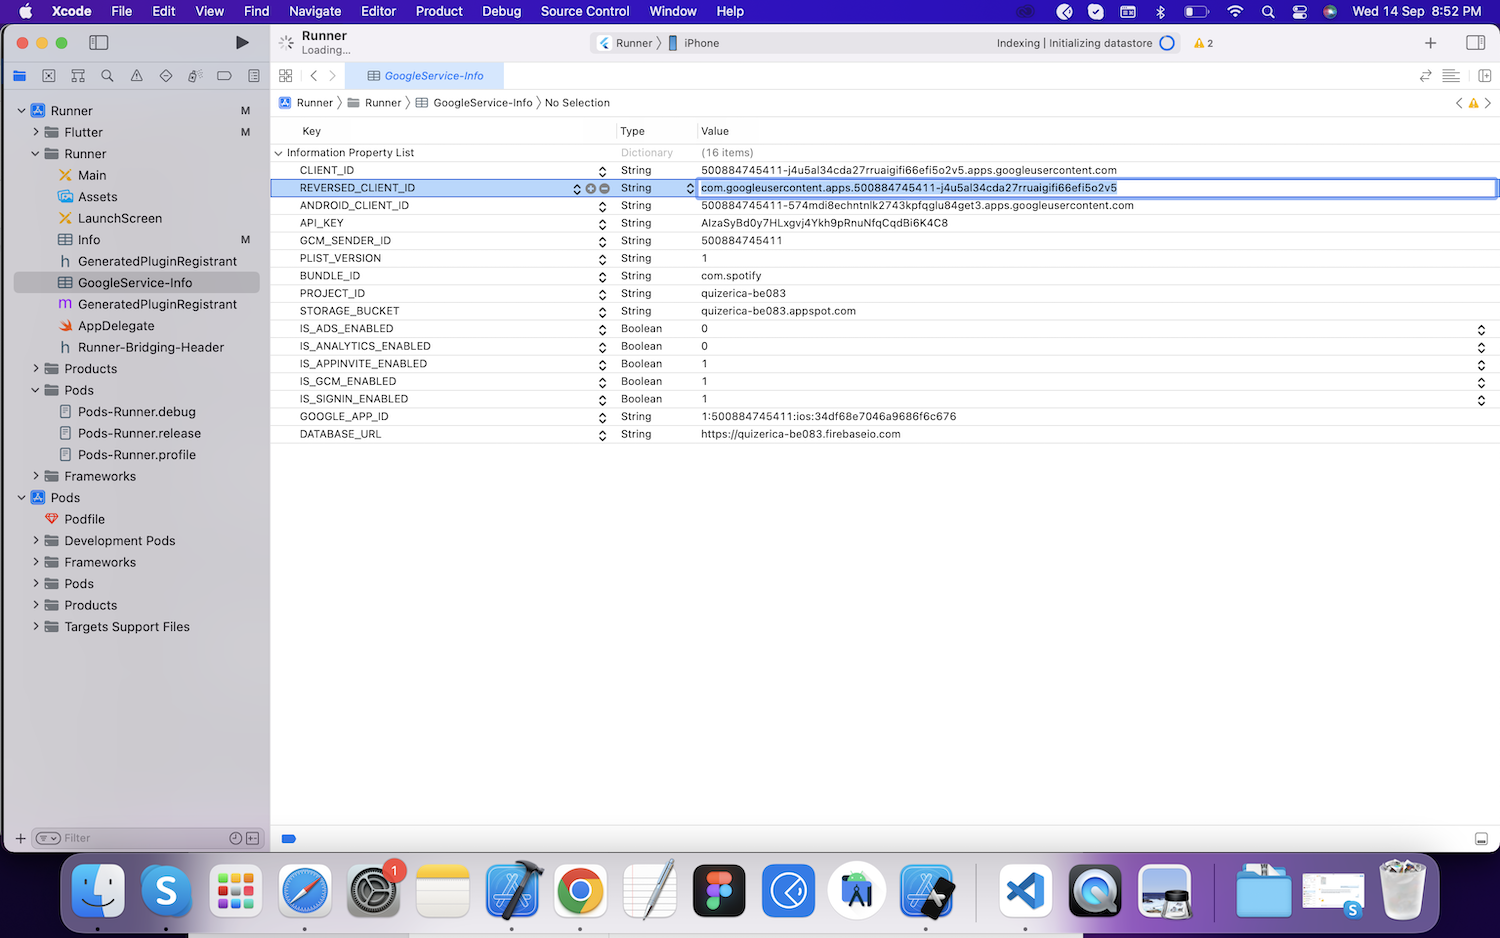
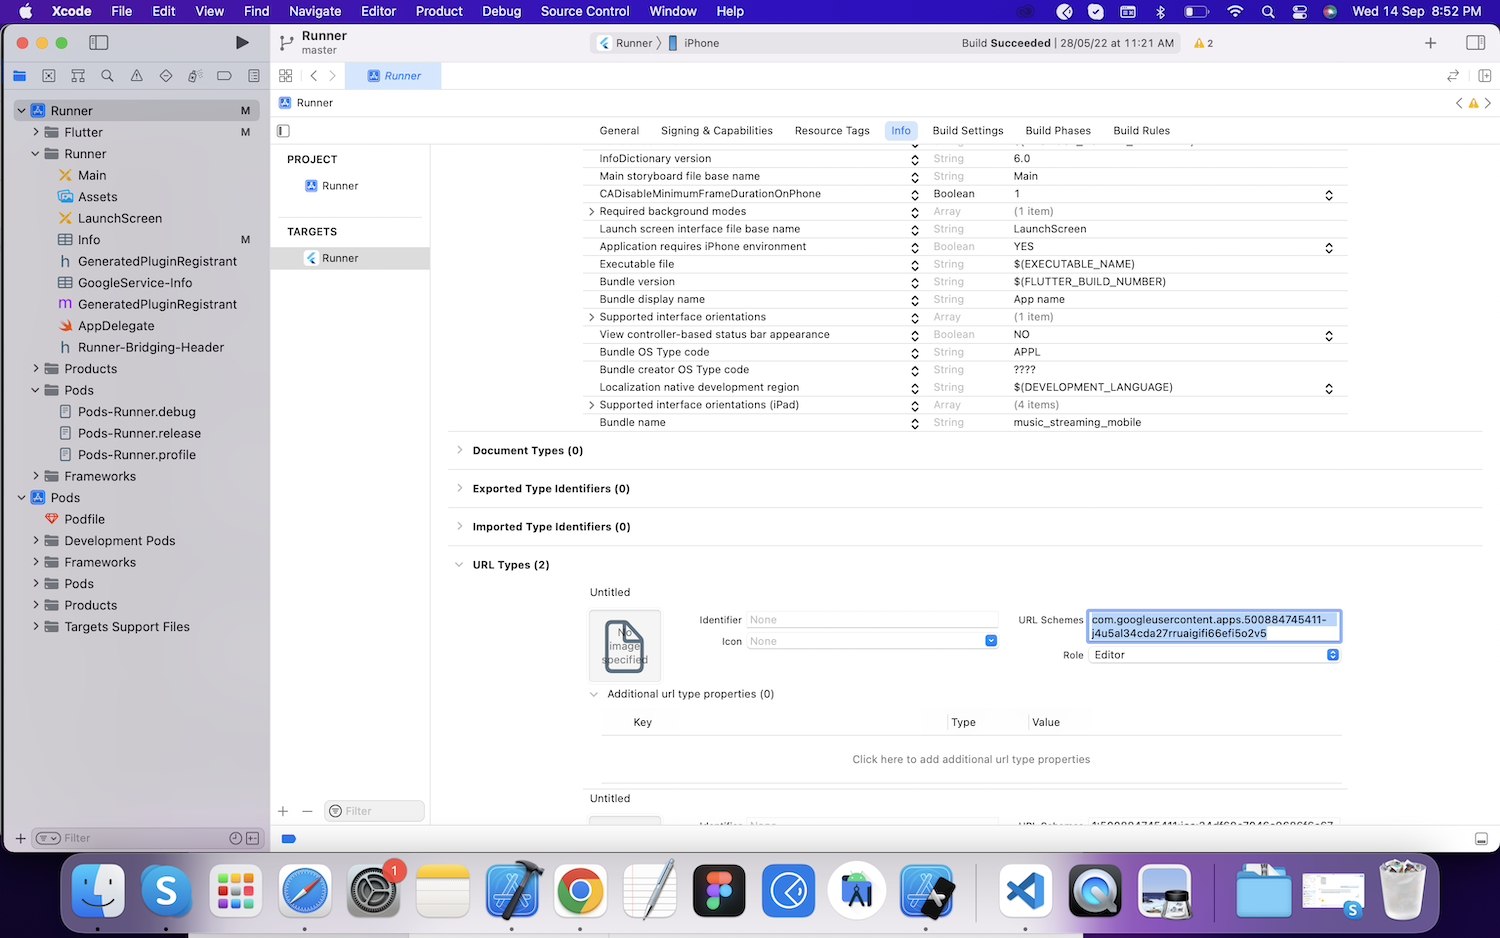
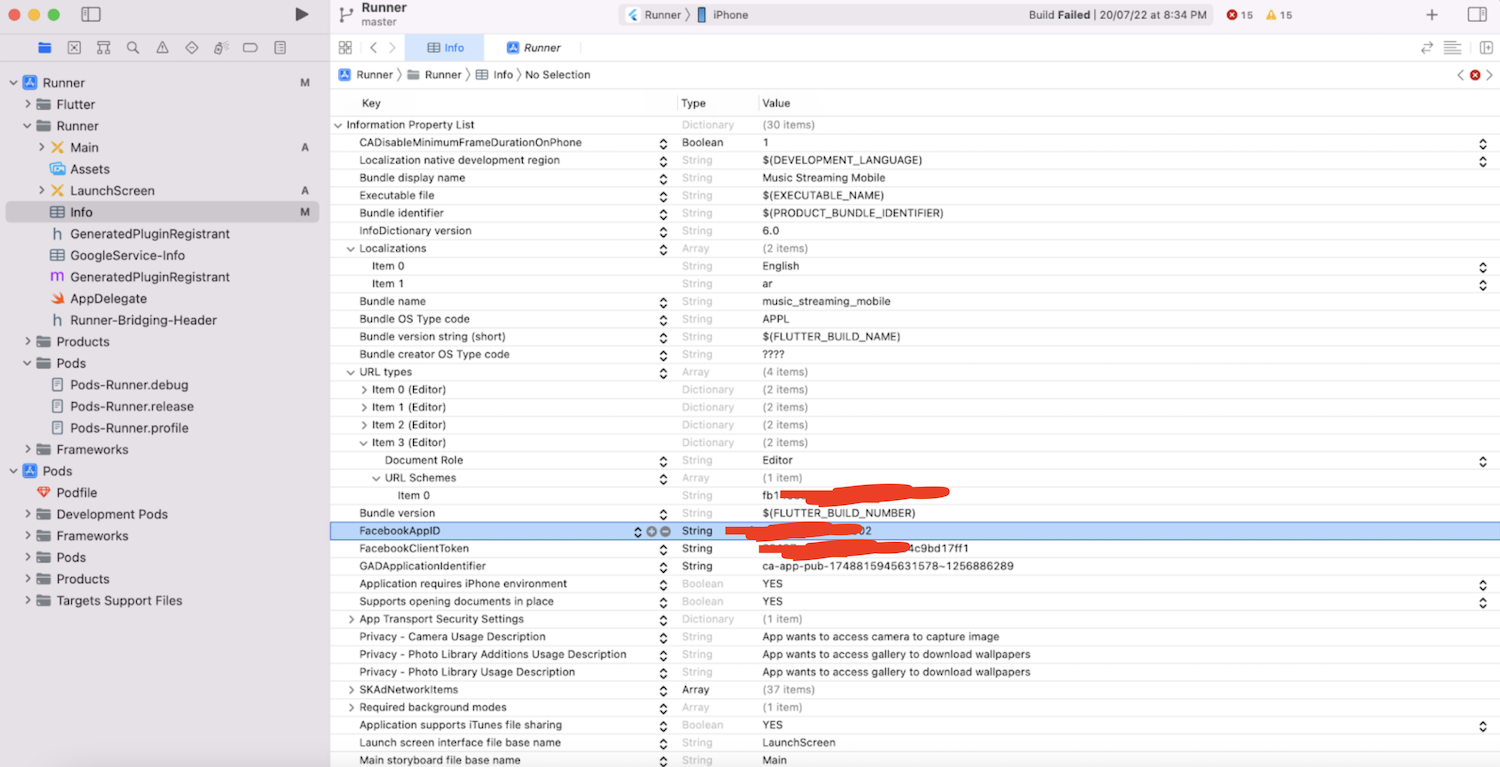
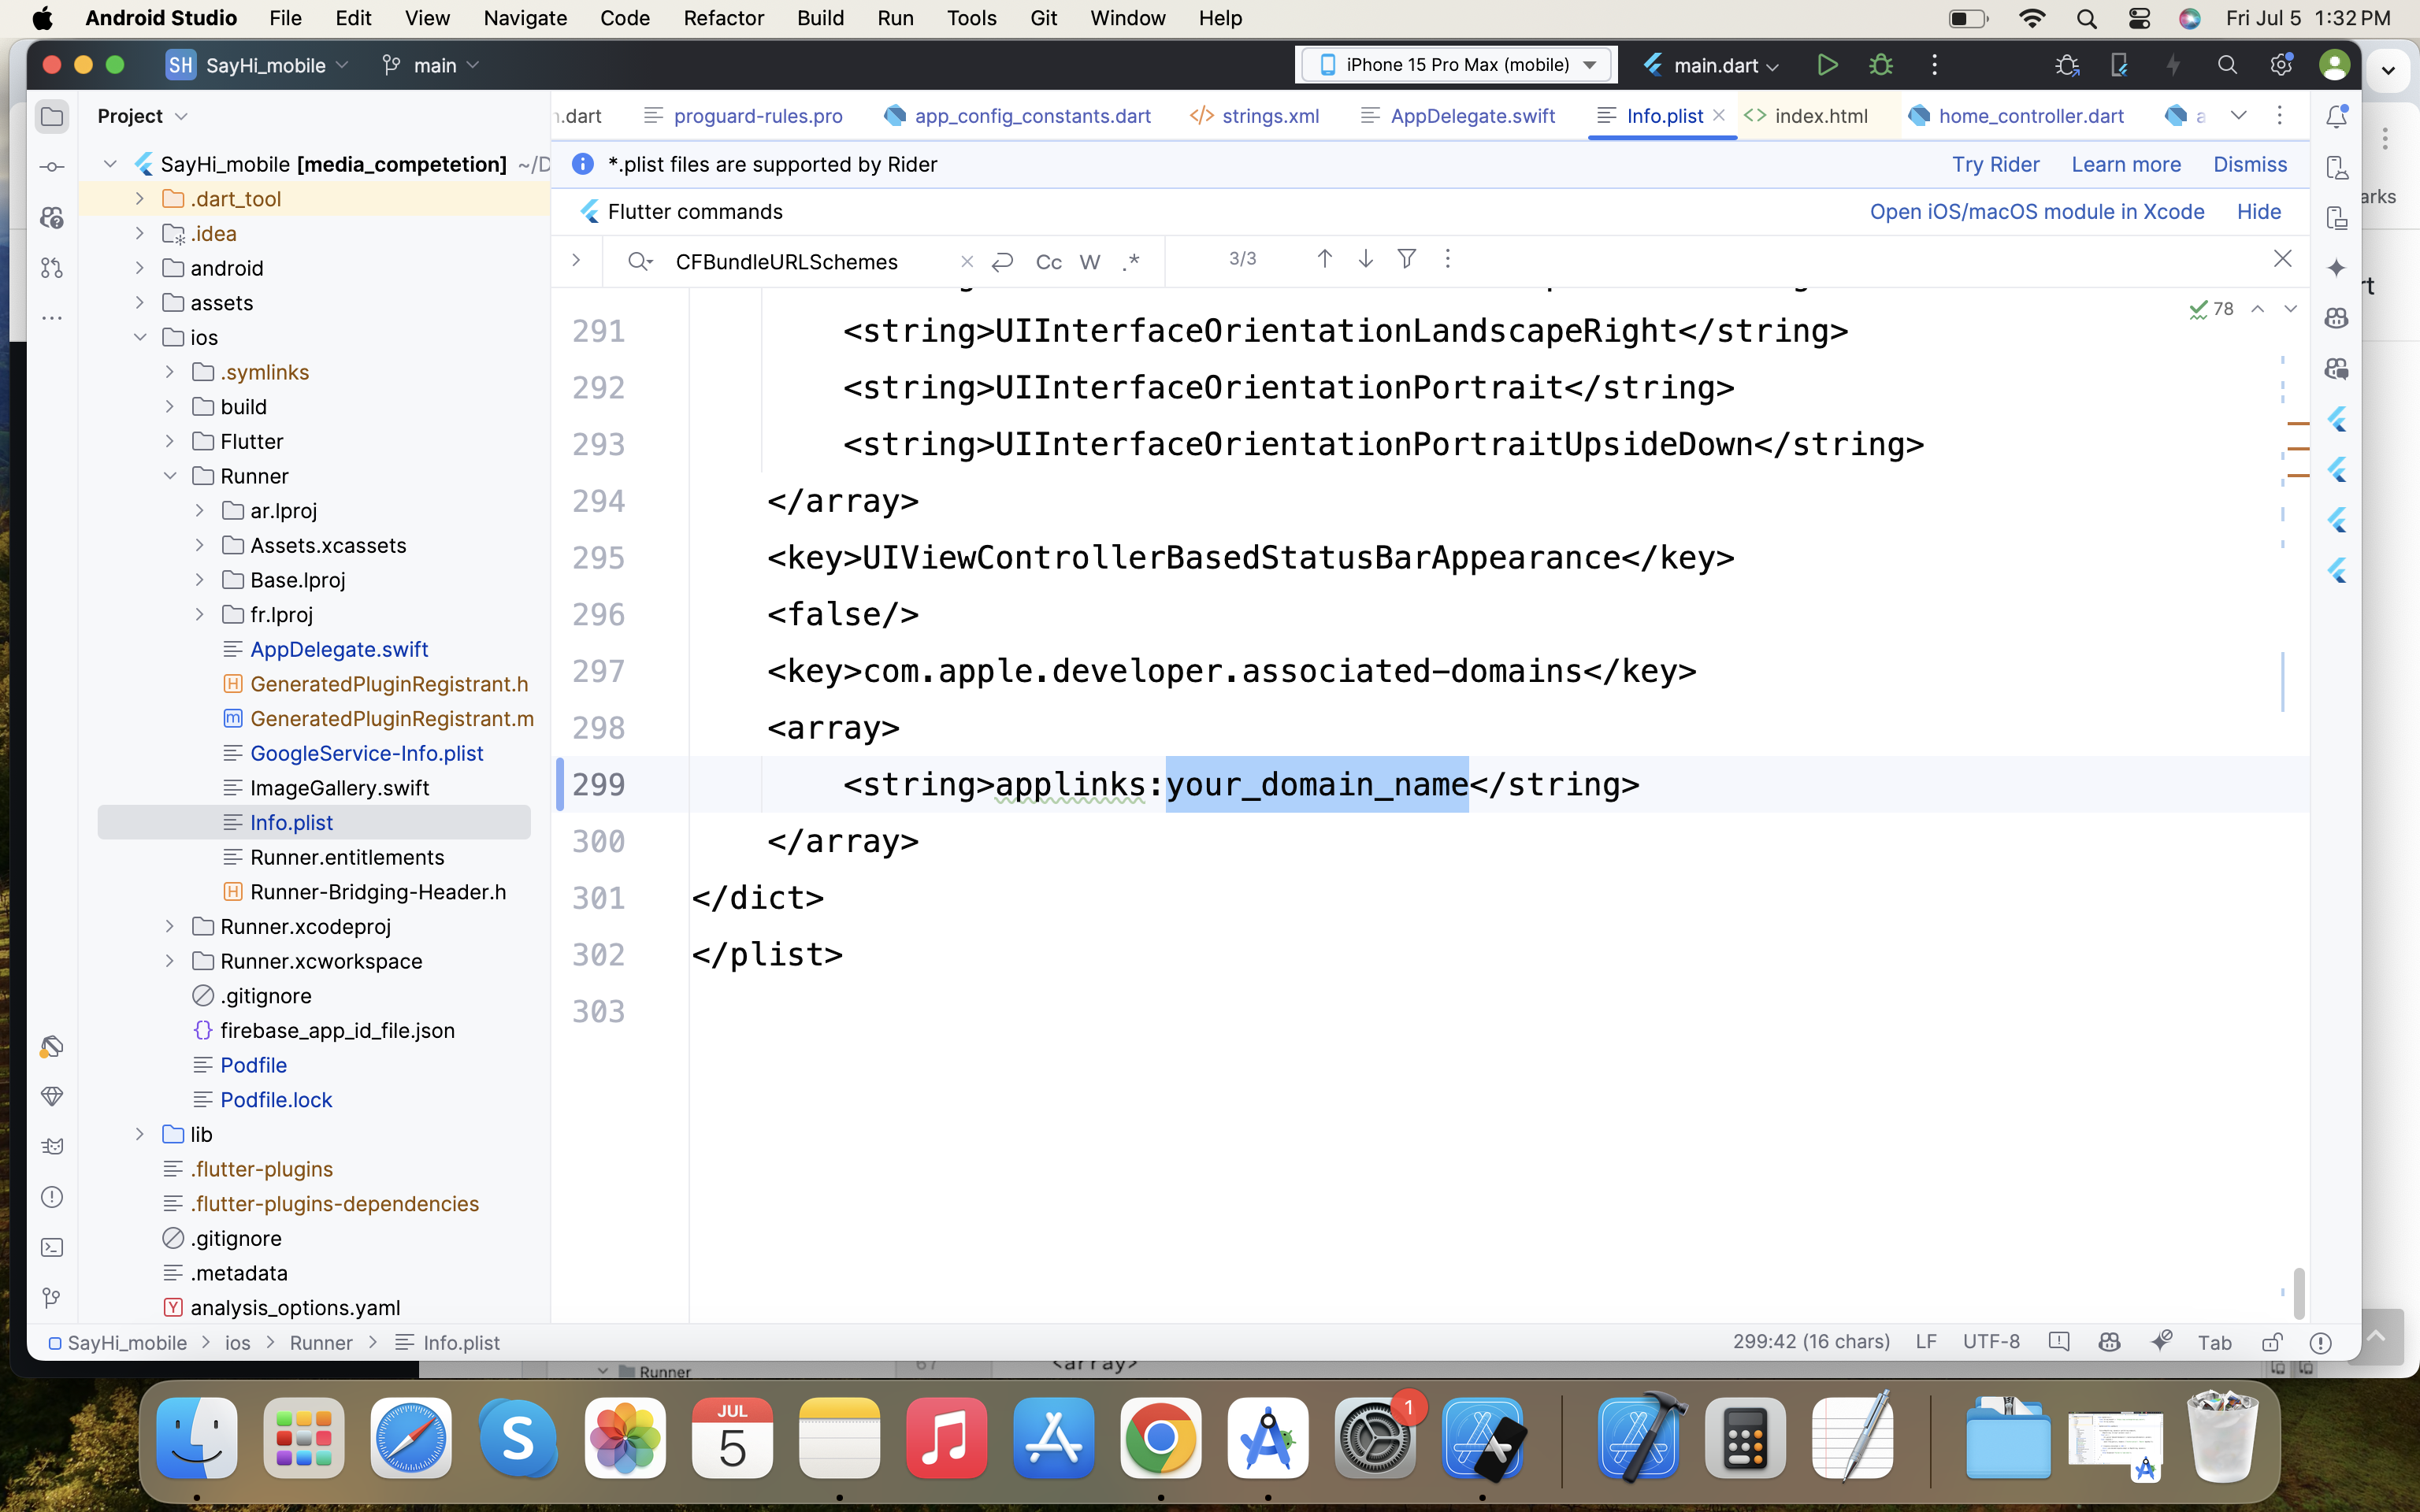
Go to ios/Runner/Info.plist
Go to 3rd key 'CFBundleURLSchemes' under 'CFBundleURLTypes' as shown in screenshot
Go to key 'com.apple.developer.associated-domains' as shown in screenshot
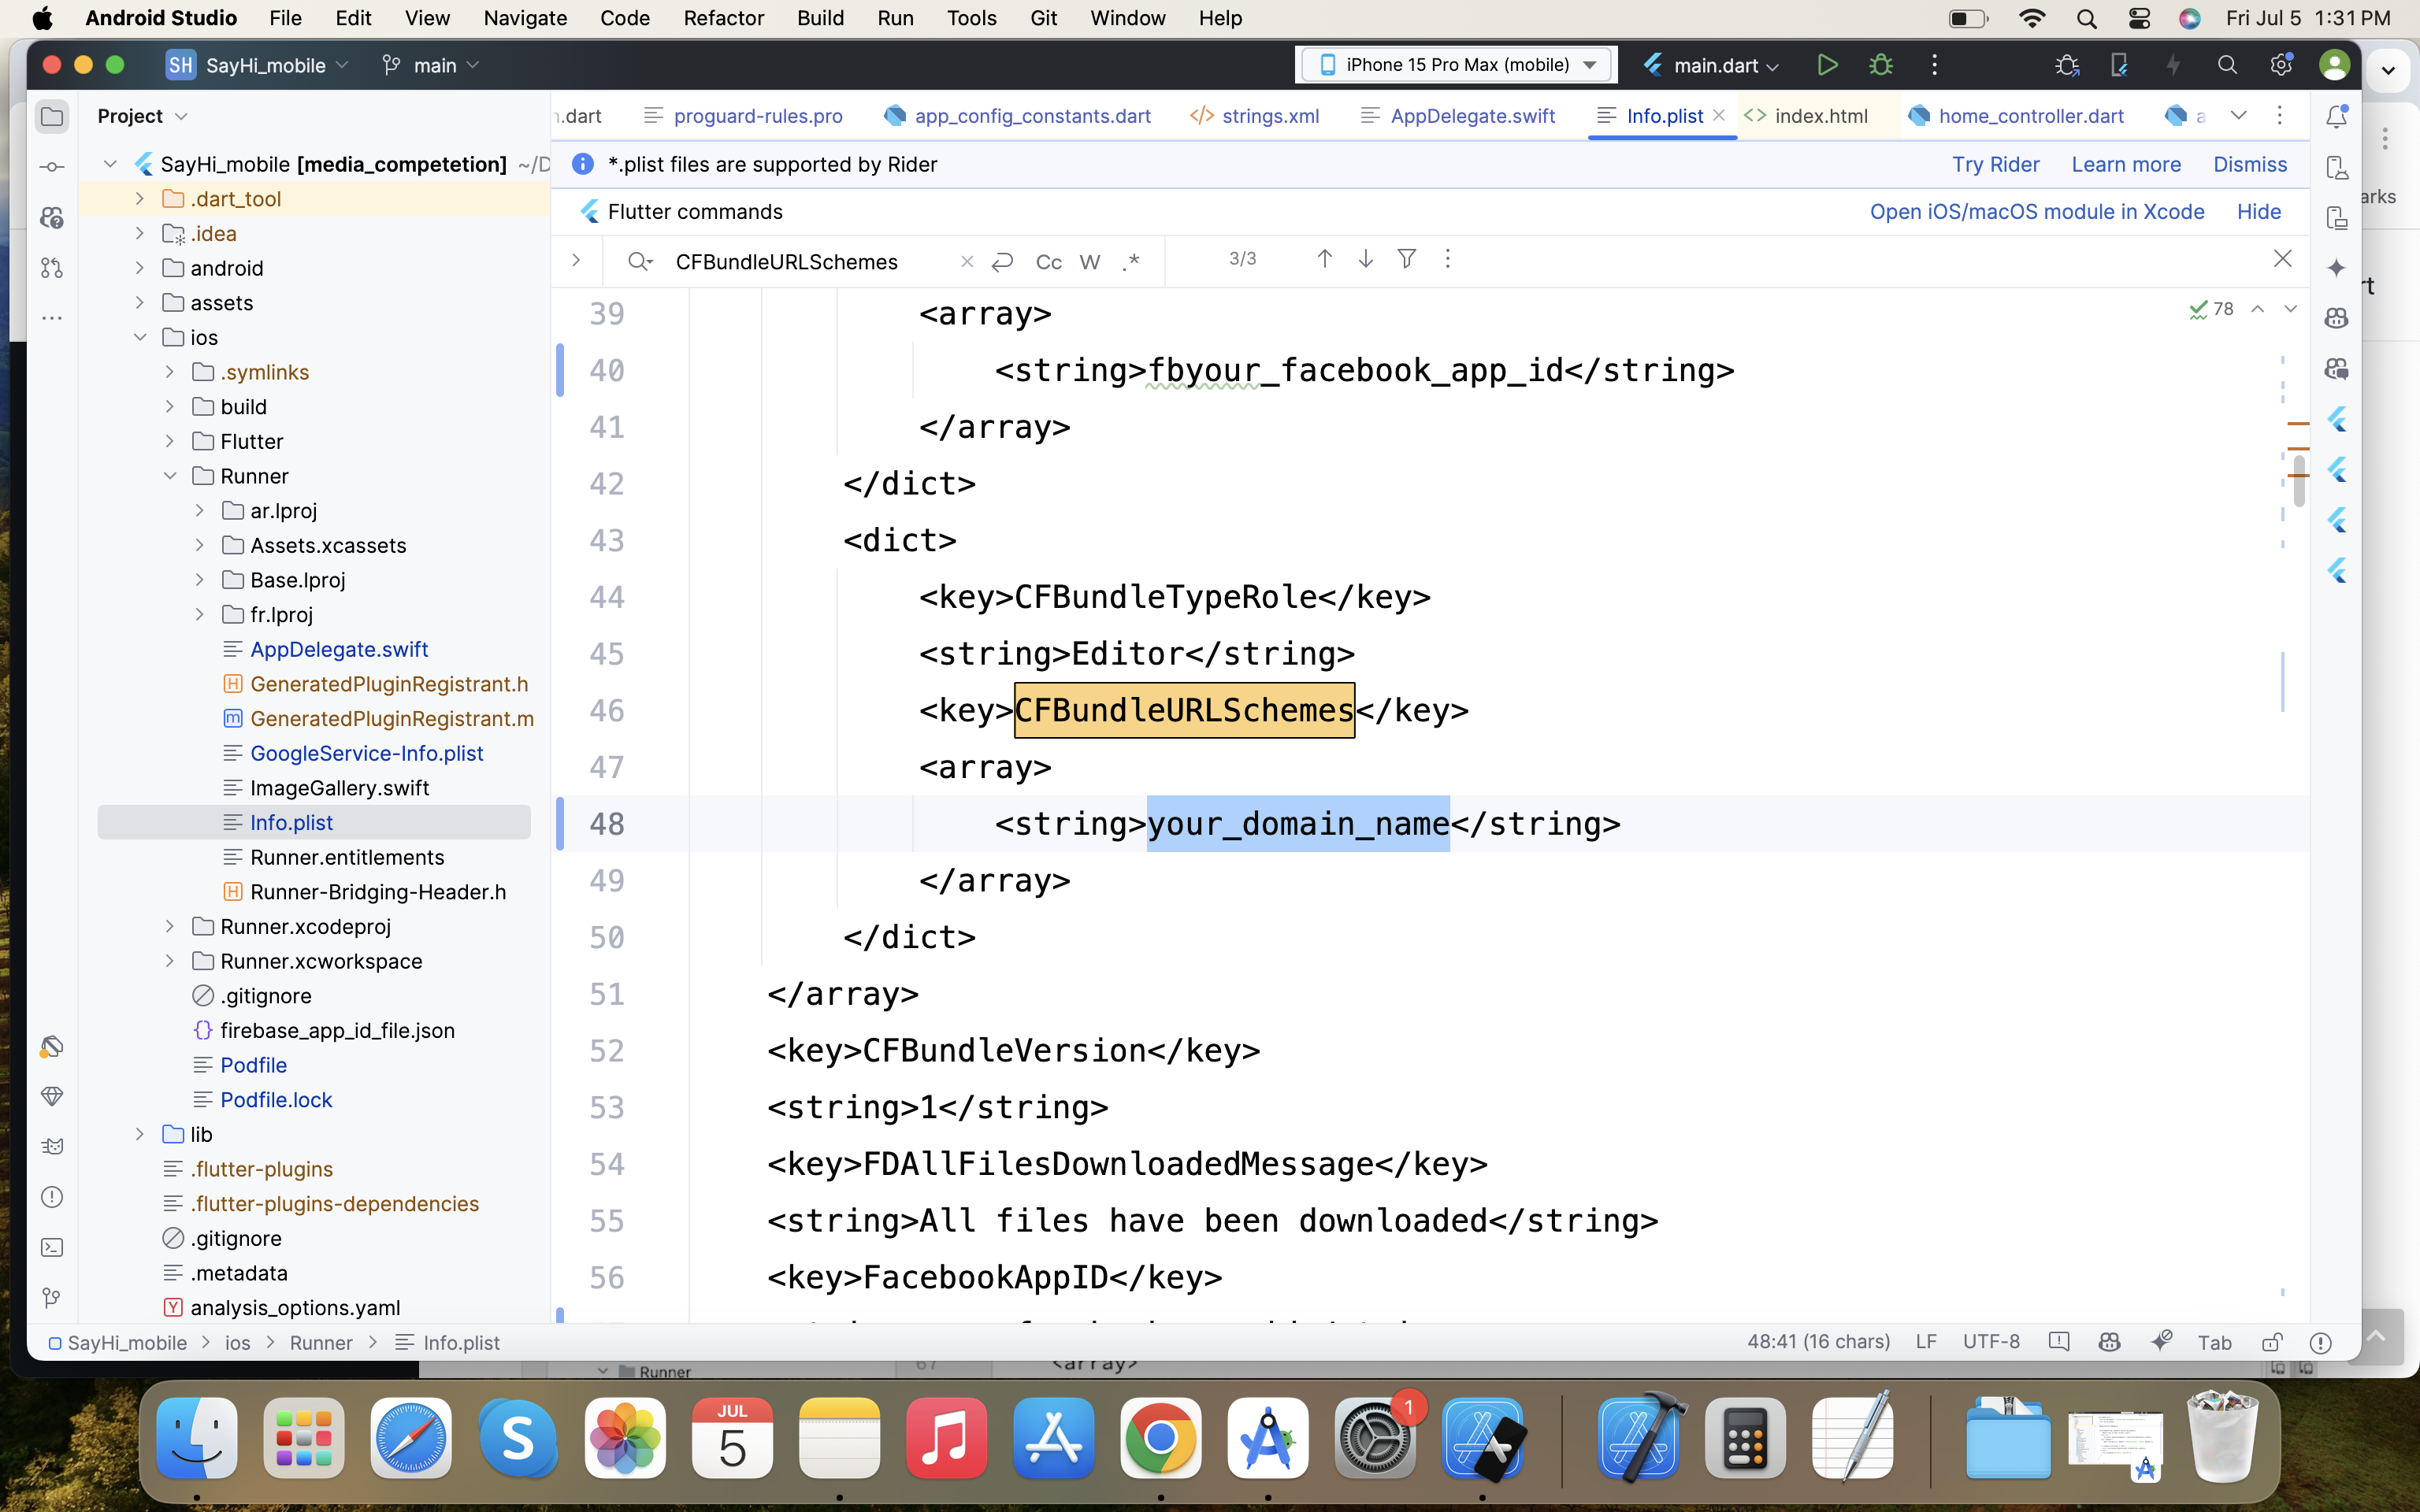
Replace your_domain_name with your domain like instagram.com, dont add http or https, or www
Change api urls
Go to "app_config_constants.dart" file and change api server(PHP) url and socket server(Node.js) url as shown in below screenshot

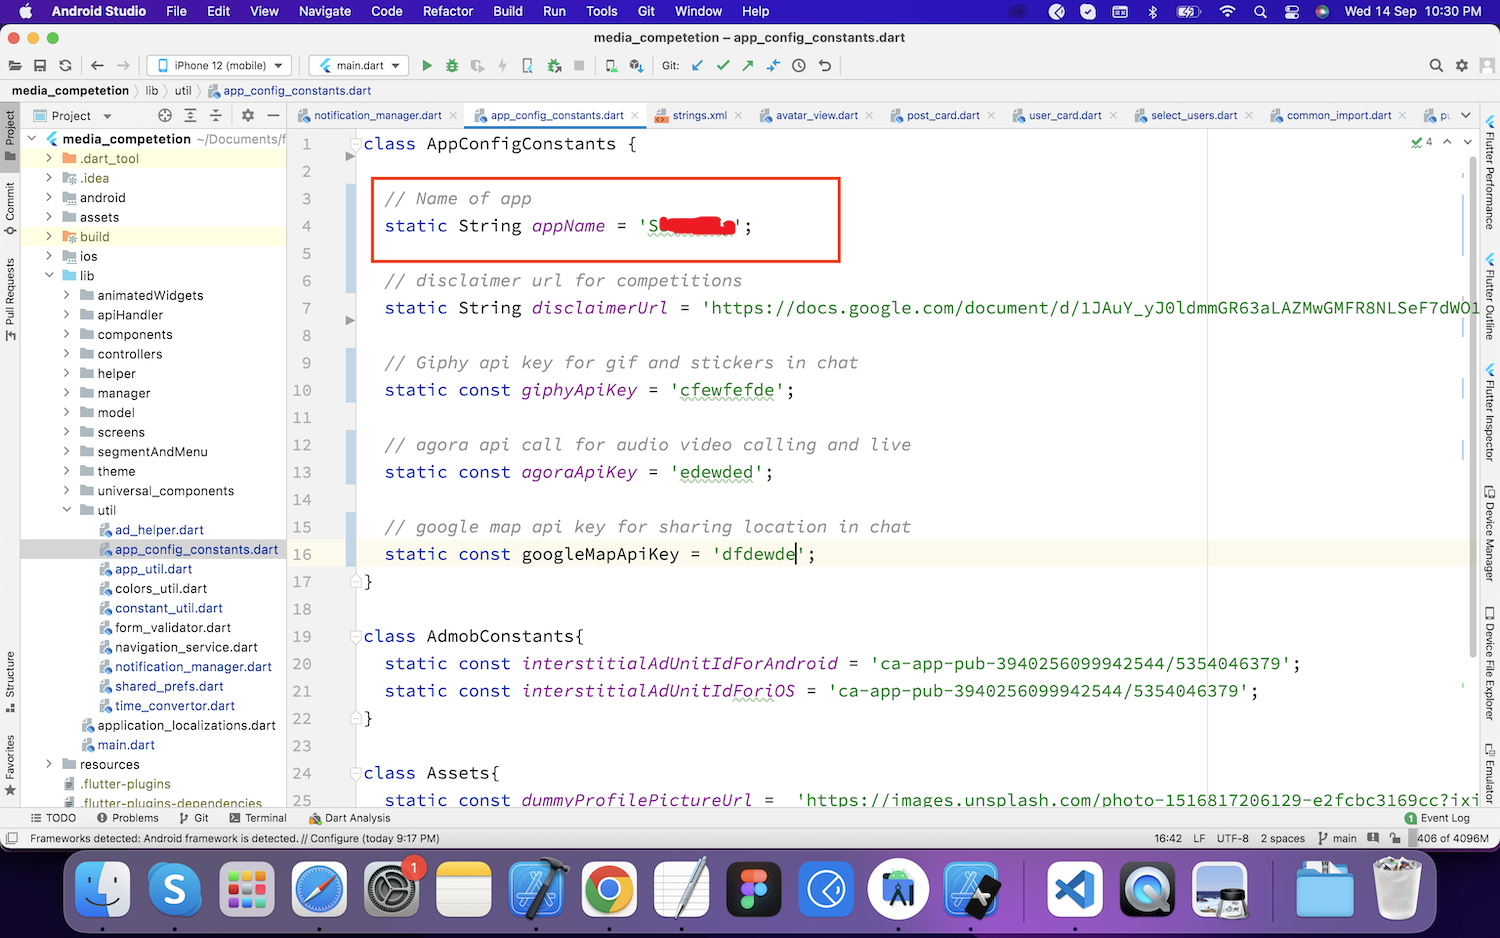
Change app name
Go to "app_config_constants.dart" file and change app and as below screenshot
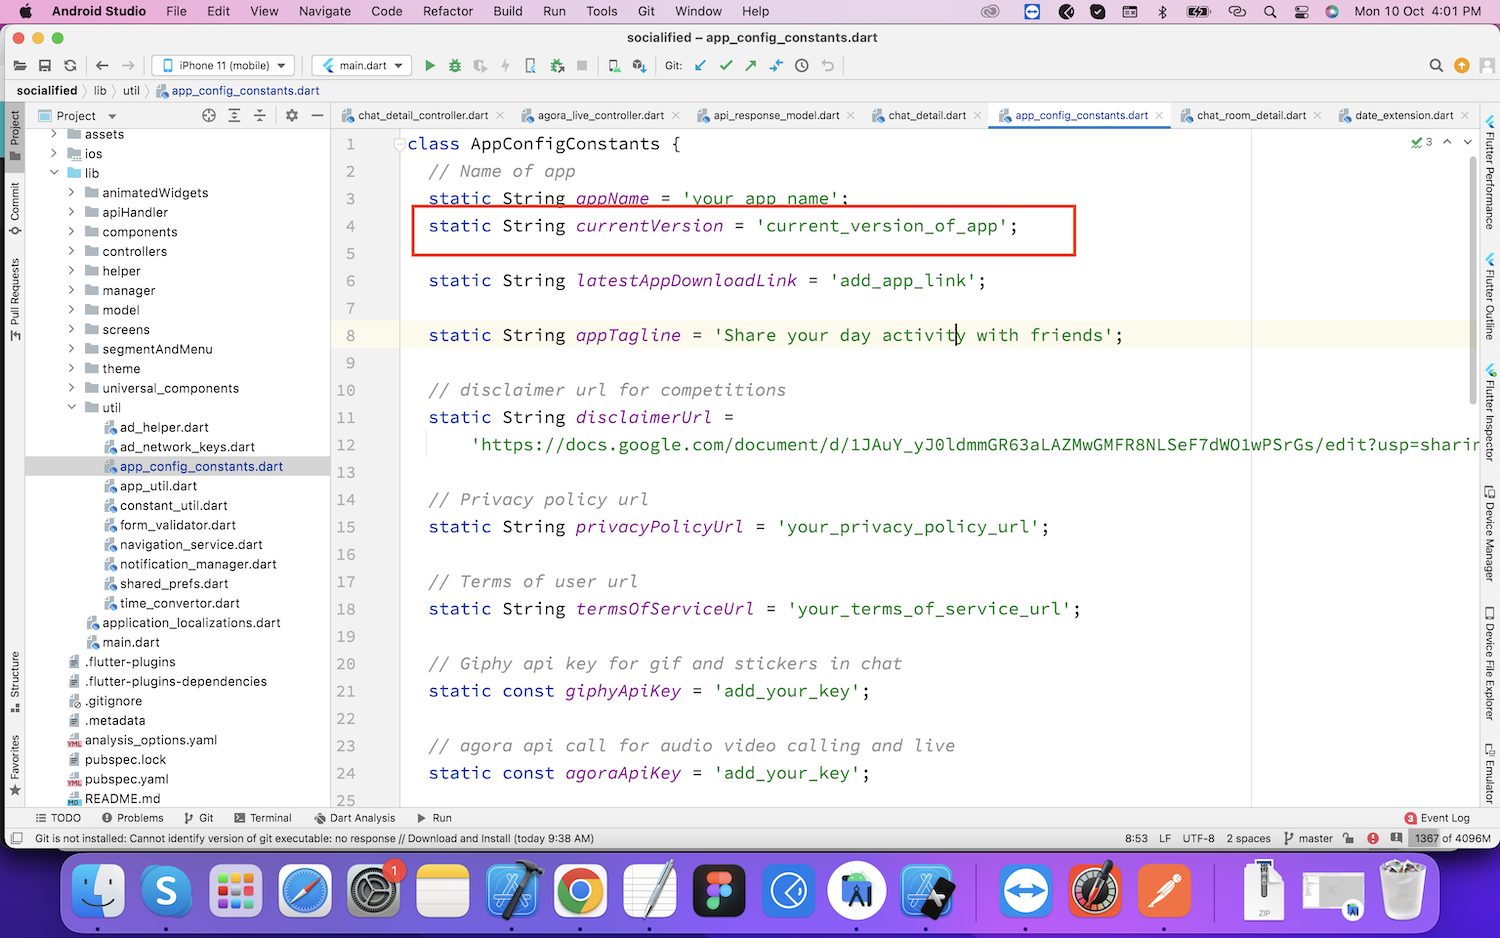
Change app version for force update
Go to "app_config_constants.dart" file and change currentVersion value to current version number of the app that you are going to publish
Change color scheme

Change localization strings
Common Setup problems/Answer
suppose if we need to call categories api, then mobile application is calling following url with adding api name "categories" like :
youdomin.com/api/web/v1/categories
if the above url is working then Rest api setup successfully.
MAil configuration can be updated in
common/config/main-local.php.
<?php
                  return [
                      'components' => [
                          'db' => [
                              'class' => 'yii\db\Connection',
                              'dsn' => 'mysql:host=localhost;dbname=DB_NAME####',
                              'username' => '#####',
                              'password' => '######',
                              'charset' => 'utf8',
                          ],
                          'mailer' => [
                              'class' => 'yii\swiftmailer\Mailer',
                              'viewPath' => '@common/mail',
                              'transport' => [
                                  'class' => 'Swift_SmtpTransport',
                                  'host' => 'smtp-relay.sendinblue.com',  // e.g. smtp.mandrillapp.com or smtp.gmail.com
                                  'username' => '############',
                                  'password' => '###########',
                                  'port' => '587', // Port 25 is a very common port too
                                  'encryption' => 'tls', // It is often used, check your provider or mail server specs
                              ],
                          ],


                      ],
                  ];
You can also use third party https://www.brevo.com/ to setup SMTP , its easy and no need extra authentication required.
You can udpate the release version from Admin Penal
LeftMenu => Setting => General Setting => Release Version
https://yourdomain:4000
It must be display "Server Started" message on your screen.
Support
If this documentation doesn't answer your questions, So, Please send us Email or contact via Skype.
Email : topiosappsworld@gmail.com
Working Days : Monday To Friday
We are located in GMT +5:30 time zone and we answer all questions within 12-24 hours in weekdays. In some rare cases the waiting time can be to 48 hours. (except holiday seasons which might take longer).
Changelog
See what's new added, changed, fixed, improved or updated in the latest versions.
Version 1.6 (08 Apr. 2025)
- AddedUpgrade to latest PHP version (v8.4.5)
- AddedUpgrade to latest Nodejs (v22.14.0)
- AddedUpgrade mariaDb version (v11.2.6)
- AddedUpgrade to latest Yii2 version
- AddedUpgrade all packages
- AddedAdded new wasabi storage system
- AddedAdded new SMS Gateway Vonage (formerly Nexmo)
- AddedAdded Email template
- AddedEvent : Now users can also create the Events ( earlier only admin can create event)
- AddedPoll : Now users can also Create poll ( Earlier only admin can create)
- FixedResoved other minor issues
Version 1.5 (18 Nov. 2024)
- AddedPin comment
- AddedPin posts
- AddedCollaborate in post : Now you are able to invite anyone to collaborate in post
- AddedPost by admin : Admin able to create post from admin panel
- AddedForgot password on Admin Panel
- AddedSuggested/following post toggle in Home Screen
- AddedMultiple account support : Users are able to login multiple accounts on app
- AddedSend gift on reels : User able to send gift on reels also.
- AddedReport Reel
- AddedFollow user directly from reel and post
- AddedSearch user option added when sharing a post
- AddedShare Reel to friends
- AddedOpen user profile by taping on users profile picture
- FixedFixed private profile content visibility
Version 1.4 (5 July 2024)
- AddedSubscription : Subscription packages via content creators, Now uses can subscribe to paid content of content creators
- AddedNudity check : Photo and video moderation (Nudity check via SightEngine and Amazon Reckognition)
- AddedMultiple SMS gateways : Added Firebase and SMS91 SMS gateways , Now you can Send OTP via Firebase and SMS91 also (Setting from admin panel to choose from Twilio, Firebase SMS91)
- AddedMoney Withdrawal
- AddedEvent link share: Now user can share event landing page.
- AddedEvent landing page : Event landing page where user can book ticket also
- AddedNotification counter : Shows number of unread notifications
- AddedRead notifications: User read/unread notification status
- AddedStorage Setting : Now Storage setting (S3,Server Storage, Azure) manageable from admin
- AddedFirebase upgraded to HTTP v1 API
- Fixedjoin competition issue
- Fixedimage slider issue in multi image post
- FixedFixed many other minor issues
Version 1.3 (20 Feb. 2024)
- AddedStory editing
- AddedText Story
- AddedShare story in chat
- AddedShow cached content in case of no internet
- AddedCreate post when a product is added
- AddedCreate a post when event is created by admin
- AddedCreate post from event manually, also When joined the event
- AddedCreate post when Fund raising is added
- AddedCreate post when donated in fund raising
- AddedCreate post when Offer is added
- AddedCreate post Job is added
- AddedCreate a post when competition is added by admin
- AddedCreate a post when competition result is declared
- AddedCreate a post when new club is created by user
- AddedCreate a post when new open group is created by a user
- AddedShare broadcast : When the user starts a live broadcast, he must invite his followers by sharing the broadcast.
- AddedPost in an event
- AddedSeparate timeline for event post feed
- AddedPost in fund raising campaign
- AddedSeparate timeline for fund raising post feed
- AddedSub-admin modules permission in admin panel
- AddedCheck-in and notes button for every event ticket booking in admin panel
- FixedPost in club
- FixedForgot password
- FixedDelete message issue fixed
- FixedOnline/ offline status issues
- FixedChat scrolling issue
- Fixedmore minor issues
Version 1.2 (14 Jan. 2024)
- AddedShare post as link
- AddedMain host can Ban users from live
- AddedHost can add moderator in Live streaming that have access to remove/ban any user from live
- AddedAdmin can see user last login detail, like device, model, IP address
- AddedBlock IP address to use app
- AddedTag location to post
- AddedManage features user wise, now you can enable/disable feature for a particular user from admin
- AddedAdd/Remove coins from user wallet via admin
- AddedEnable/disable last seen and online status
- Added2 Factor authentication for admin
- AddedChange user name and password for admin
- FixedCopy ChatGPT response
- FixedDuplicate phone number account reg issue
- FixedShow live joined users count in live suers listing
Version 1.1 (20 Nov. 2023)
- Added Search screen with default data before searching.
- Added Added camera option for post and chat.
- Added Delete comments
- Added Like comments
- Added Report comment
- Added Reply on comment
- Added Reply on story
- Added Account privacy
- Added Post Photo/Video editor
- Fixed Theme color issue turned to blue some time
- Fixed Verified blue tick icon everywhere
- Fixed Copy chatgpt answers
- Fixed Delete blocked and deleted users posts
Version 1.0 (01 Oct. 2023)
Initial Release